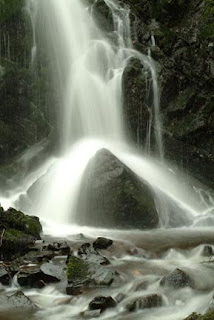
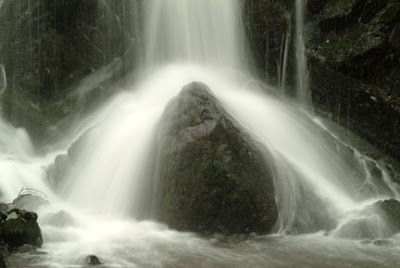
These two picture show just how easily you can allow your viewer’s eye to drop off the bottom of your composition. There are no hard and fast rules here, but generally, white or light areas in your picture will attract the eye – like a moth to light. So if you leave a bright white area at the edge of your frame – at the sides, top or bottom - your viewer’s eye will be attracted to it. Often it will not come back into the picture and the viewer will lose interest. The eye has a tendency to do this in the top photograph which has an intense white area at the bottom edge.
In the lower photograph I have moved the camera back a little to take the white area back into the frame and away from the lower edge of the composition. This darker foreground ensures that the viewer’s interest does not drop away. However, I do find the rock at the bottom of the shot just a tad distracting.
WHITE BALANCE
A word about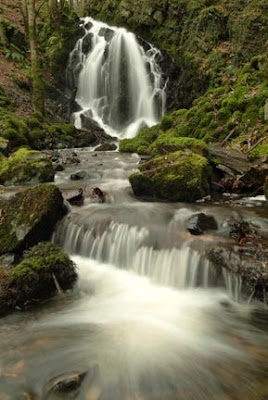 white balance here when photographing this type of subject. In this situation the waterfall was in the shade of a deep ravine. That meant high temperature blue light. By all means experiment with your White Balance (WB) settings, but I tend to avoid Auto White Balance (AWB) in these situations because it can be difficult to achieve consistency between each shot due to the fluid ‘self-adjusting’ nature of the AWB mode - it can change the colour of your picture by very small degrees each time you adjust your composition. I found that setting the camera on the ‘cloudy’ white balance icon gave exactly the tones I wanted without making the water look too yellow. Using these WB icons, or indeed setting a Custom White Balance, locks the white balance on that particular setting, so the colours should not change between frames.
RECTANGLES
In the lower photograph I have moved the camera back a little to take the white area back into the frame and away from the lower edge of the composition. This darker foreground ensures that the viewer’s interest does not drop away. However, I do find the rock at the bottom of the shot just a tad distracting.
WHITE BALANCE
A word about
 white balance here when photographing this type of subject. In this situation the waterfall was in the shade of a deep ravine. That meant high temperature blue light. By all means experiment with your White Balance (WB) settings, but I tend to avoid Auto White Balance (AWB) in these situations because it can be difficult to achieve consistency between each shot due to the fluid ‘self-adjusting’ nature of the AWB mode - it can change the colour of your picture by very small degrees each time you adjust your composition. I found that setting the camera on the ‘cloudy’ white balance icon gave exactly the tones I wanted without making the water look too yellow. Using these WB icons, or indeed setting a Custom White Balance, locks the white balance on that particular setting, so the colours should not change between frames.
RECTANGLES
Once again I have explored the subject by breaking it down into a series of simple rectangles, and the two bottom photographs show just how different the framing can be of the same subject – if you think in rectangles. In this case, one horizontal and the other vertical. Remember, explore your subject – look for those rectangles. Your output of good photographs will multiply and you will come away from every location knowing that you have gathered every good picture that could be taken.