Showing posts with label light direction. Show all posts

6 Oct 2008

Light and wine in Menorca


I have two very different pictures to show you this time from the group on the Menorca photography holiday. I was particularly delighted to see Ian Smith’s photograph (below) taken at the trotting races because of the way he has captured the wonderful backlight. This was Ian’s second time with me to Menorca and I have seen a tremendous advance in the way he is capturing the world around him on this trip. He is now constantly aware of the light direction and quality and always trying to improve his framing and composition. His efforts are really paying off. Just look at the way he has caught the light shining through those translucent cart wheels. The contrast of this brightness with the dark shadows under the trees has really brought drama and power to the picture.

In complete contrast, Phil Hallam took the top photograph in pretty flat light conditions when we visited the Binifadet bodega. The old lorry was parked outside the bodega and the blues and purples have helped make a very eye-catching image. I love the simplicity of this shot, which conjures up all sorts of impressions of the Mediterranean life-style despite the lack of sun light.

Pictures by Phil Hallam and Ian Smith

10 Feb 2008

Photographing older people - part 1

It’s an old saying that a person has the face he deserves by the age of forty. Maybe these days sixty would be more appropriate. Certainly as far as photography is concerned, the older a person gets the more of their life story will be etched into their features – and this means that older people make natural and fascinating subjects for portraiture. The sensitive photographer should be able to capture the essence of a person’s personality and of course this will be that much easier if you have a good, expressive face to photograph.

Remember, an understanding of light is your most important tool and most vital asset; its direction, quality and colour. The direction of light that can most often enhance texture, shape and form is sidelight. So it stands to reason that if you are photographing an elderly person and you want to emphasise the lines and wrinkles of that person’s skin – its texture – then side light can come in very useful. However, like everyone else, some older people can be extraordinarily vain, and will not take too kindly to photographs that make them look decrepit. So a degree of diplomacy may be needed if a photography session is to go smoothly. If you want to take a more flattering picture, try using backlight and reflect it back into the subjects features with a white reflector. We touched on this simple technique when I wrote about the Quality of Light.

I love photographing children because of their natural innocence and charm – they can be very funny. Well so can older people, and often the spark of youthful mischief and memories can still be seen in the older subject’s eyes and facial expressions.

Older people tend to be less self-conscious and easier to work with than younger adults. Older people often take it as a great compliment that a photographer should want to spend time photographing them, and will usually be more than willing to give their time as a result. You will almost certainly be able to work closely with an older person in order to achieve the picture you have in mind. So explain exactly what you want to achieve at the start of the session

Top photograph
How could any photographer resist a face like this. The light is from one big window to the right of the camera. It was very important that the shepherd’s hands and his crook should be included in the composition – they told his life story
Bottom photograph
Share your enjoyment when you are photographing older people. They are naturally interesting in the photographs you have taken. This is Graham, one of the student photoghraphers who joined one of my photography holidays in Menorca. He's showing the old guys outside a Bar the pictures he has just taken of them – it breaks the ice and can lead to many more wonderful photographs and opportunities – it makes it all fun!


Next in Part 2 - 5 good reasons for photographing older people

17 Jan 2008

How to use the direction of Light - part 2

You must be able to recognise the particular attributes, advantages and disadvantages of any light source instantly. This will let you to get exactly what you want from every subject.

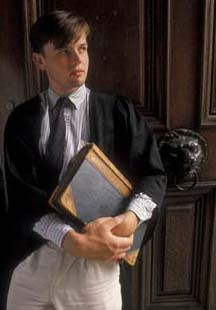
We’ve already looked at sidelight, but just to re-enforce how useful it is take a look at the superb sidelight used in the photograph of the young student. The picture was taken in an open doorway – a very useful location for finding sidelight – especially when the sun is high in the sky - see today’s TIP.

Roughly, the direction of light can be divided into side, front, back and toplight.

Bear in mind that in the real world the direction of light might be a combination of some of these headings…. ‘toppy-back’ light, for instance - there’s a new word for you. Sometimes the light may be totally non-directional. You won’t always be able to change the direction of the light – but often you will be able to adjust your shooting angle or the position of your subject in order to make the most of what you have. For instance, you may be able to time your visit to a certain location to coincide with the direction of light that will show it off best. Sadly, this is not always possible especially for professional photographers under pressure of time and deadlines. They will have to resort to all sorts of tricks – but I’ll tell you more about those in future articles.

TOPLIGHT
This is the one to avoid whenever possible. Professional travel and landscape photographers work both ends of the day – morning and evening. That’s because the light source, the sun, is low in the sky and can be used as front, side or backlight. With the light directly above, portraits look horrible. Landscapes and buildings look boring and no matter in which direction you look at it, the light remains the same.
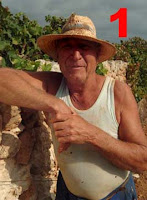
Photo 1 Ugh! Toplight. This is the one to avoid whenever you can. It’s midday and the sun is high overhead – definitely not a time to take portraits like this – especially if your subject is wearing a big hat. Avoid it. Come back later or ask your subject to step into a doorway where you can use sidelight – anything to avoid toplight

BACKLIGHT
Shoot into the light and put the light source behind your subject and, in the most extreme case, you will create a silhouette - emphasizing outline shape. Backlight does not have to be quite so obvious, though, and with a little diffusion from such things as clouds or reflectors, it can create a soft, subtle ‘atmosphere’. I’ve already touched on this when I wrote about the ‘quality’ of light. Backlight often creates a rim, or halo effect around the subject – this is much-used in studio portraiture to separate the outline of the model from the background. If you intend to emphasize the outline shape of your subject, use backlight.
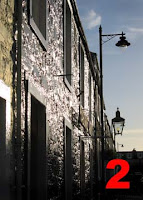
Photo 2
Using backlight to photograph this street, most of the colour has gone, and the picture looks monochrome. The powerful backlight has shown the outline shape of the street lamps – and notice the effect of using backlight on the shiny, uneven surface of that dark wall. It really has created a dramatic effect. Remember, backlight over a dimpled, shiny surface – like wet mud, ripples on water, wet cobbles or even wet grass, can create spectacular result


FRONT LIGHT
Put the light source directly behind the camera - front-on to your subject - and you take away the shadows. This tends to ‘flatten’ the image; it loses any 3D effect. However, front light has a great trick up its sleeve… shadows often obscure colours. So if you want to see more colour – use front light. The downside is that you lose texture and form in your subject.
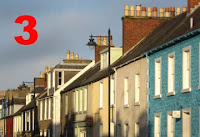
Photo 3
With the light almost directly behind the camera and front-on to the subject, I have tried to accentuate the bright colours of these houses by taking most of the shadows away. But at a cost – look how flat and two-dimensional the chimney pots look. The shadows you can see in the bottom of the picture are cast by a row of houses behind me

TIP
Positioning your subject just inside a doorway, out of the direct sun, is almost guaranteed to offer you good sidelight. This is one of the simplest ways to avoid toplight and create beautifully lit natural portraits when the sun is high in the sky at midday. That’s the time to start looking indoors in search of better, more useable light.

Next, in part 3 - more tips on using the direction of light

14 Jan 2008

How to use the direction of Light


Good light is the photographer’s most vital yet least understood ingredient - more important than a whole bagful of expensive gear. Let’s face it, you can’t take photographs without light, so the more you get to grips with it, and understand what it can and can’t do, the better. A sound understanding of light will transform the way you see and enable you to express yourself visually. It will help you highlight the vibrancy of colours, create visual mood, pick out the textures of everything from stone walls to wrinkly faces; hide blemishes in younger faces, and capture the outline shapes of almost any subject you choose.

Oddly, you don’t need a camera in your hands to practise ‘seeing the light’. Start by observing the way it falls on everything around you; people’s faces, buildings, trees, water. You can do this any time, anywhere, no matter what you are doing; walking to work, sitting by a window, out shopping. This is part of a process that will enable you to be objective about your photography and to start seeing the way the camera sees.

Only by understanding and seeing the way the camera sees will you be able to express your visual ideas with certainty.

Observing light soon becomes a habit – a way of seeing - and you won’t be able to stop seeing it once you start – I tell my students it’s like the Chinese curse of having a monkey on your back – you can never get rid of the habit once you’ve got it. However, our Light Monkey is a helpful soul and he is always there to help… although he may give you a sharp poke in the ear if you stop listening to him.

Good, and appropriate, light can enhance you photographs in so may ways. Just one of those ways is to accentuate the illusion of depth within your two-dimensional image. Think of yourself as an illusionist – one of the most powerful illusions you can create is that illusion of depth – the third dimension. Composition is one way to achieve this, the other is intelligent use of light direction and quality.

I’m going to be looking at the different directions of light and how they can transform and enhance your photographs. First, let’s talk about side light – it’s perhaps the star of the show.

SIDELIGHT
With the light to one side of your subject (almost any subject), you will create the illusion of depth, texture, shape, form, substance, on your two-dimensional photograph. This can be powerful stuff. Side light can transform everything from portraits or landscape into strongly textured images with the illusion of that third dimension. Beware, though, with portraiture it shows every imperfection of a model’s complexion, some subjects hate it as it shows the texture of their skin (wrinkles), so it’s not the way to disguise those ‘laughter lines’. In townscapes it can make buildings appear as 3D cubes. In landscapes, sidelight makes tree trunks look round, and brings out the contours and textures of hillsides and fields – and all because the light is on one side and shadows are on the other.

Top photograph

Side light gives the illusion of the third dimension, by emphasizing texture and form – just look at that red table cloth and the roughness of the white wall. But it has another trick up its sleeve; it can create strong shadows, like that of the man projected on the wall. These shadows can be used as compositional devices. They become an integral part of the image and can, as in this case, help convey more information to the viewer. At first glance it is not entirely clear what the man is doing, he might be playing a tin whistle, although the cigarette packet on the table is a clue - but the shadow on the wall tells the story instantly and gives the information that he is lighting a cigarette.
Next, I'll be looking at frontlight, backlight and toplight
