
Beauty, they say, is in the eye of the beholder – well, I find old junk a constant source of inspiration.
Give me a barn full of old tat and I’m in heaven. Problem is, so many people just throw their old stuff out before I get around to photographing it. Fortunately there’s a retired farmer near my home in Galloway who still has a treasure chest of rusty old implements and tools in his barn. Hopefully he’ll never get rid of it and I’ll be able to keep going back to take pictures. I sometimes take my students there, but it’s best if they are on the same wavelength if they are to get the full benefit from the place.
There are old boats that haven’t seen the water since the 1960s, a road roller of similar vintage, farm implements hung on the walls and scattered around the floors, saws, spanners, you name it. There are colours, shapes, textures and heavy doses of nostalgia everywhere you I look.
When you are confronted with so many photo opportunities like this, it’s always best to take a good look around first and work through the place methodically with some outline plan about what you want to achieve. This way you won’t be stumbling around aimlessly trying to pick off pictures here and there. You’ll have a system.
I started just inside the doorway where I used the available natural light with the camera on my solid Benbo tripod. I photographed an old boat and the road roller. If possible, always walk all the way around the objects that catch your eye – ask yourself what it was about them that attracted you and then try to accentuate that aspect. Is it the colour, for instance, the texture, outline shape? Perhaps the object tells a story – like the wooden boat resting on the pram wheels. Whatever it is you must try to maximise it in order to bring impact to each picture.
There is no need to hurry in these situations. You can enjoy every minute, so take your time and consider each picture angle carefully. The light is unlikely to change dramatically, so again this will not put you under any pressure. Take a good big white reflector with you so that you can direct some light into the shadows, or even bounce your flash off it. There are endless possibilities once you get started.
Photograph 1 (top)
The the first thing I saw when walking through the barn door was this old roller. I explored it from all angles – walking round it several times and took lots of pictures, but it was the front view that really interested me. I moved right in to crop out all the surroundings. I also set my WB (White Balance) to Cloudy. This added more yellow and emphasized the orange paint and reddish rust of the subject
Photograph2
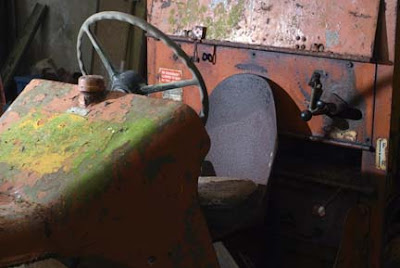 I also photographed the roller’s steering wheel and seat, but this time I used some flash to give harder, crisper lighting.
Give me a barn full of old tat and I’m in heaven. Problem is, so many people just throw their old stuff out before I get around to photographing it. Fortunately there’s a retired farmer near my home in Galloway who still has a treasure chest of rusty old implements and tools in his barn. Hopefully he’ll never get rid of it and I’ll be able to keep going back to take pictures. I sometimes take my students there, but it’s best if they are on the same wavelength if they are to get the full benefit from the place.
There are old boats that haven’t seen the water since the 1960s, a road roller of similar vintage, farm implements hung on the walls and scattered around the floors, saws, spanners, you name it. There are colours, shapes, textures and heavy doses of nostalgia everywhere you I look.
When you are confronted with so many photo opportunities like this, it’s always best to take a good look around first and work through the place methodically with some outline plan about what you want to achieve. This way you won’t be stumbling around aimlessly trying to pick off pictures here and there. You’ll have a system.
I started just inside the doorway where I used the available natural light with the camera on my solid Benbo tripod. I photographed an old boat and the road roller. If possible, always walk all the way around the objects that catch your eye – ask yourself what it was about them that attracted you and then try to accentuate that aspect. Is it the colour, for instance, the texture, outline shape? Perhaps the object tells a story – like the wooden boat resting on the pram wheels. Whatever it is you must try to maximise it in order to bring impact to each picture.
There is no need to hurry in these situations. You can enjoy every minute, so take your time and consider each picture angle carefully. The light is unlikely to change dramatically, so again this will not put you under any pressure. Take a good big white reflector with you so that you can direct some light into the shadows, or even bounce your flash off it. There are endless possibilities once you get started.
Photograph 1 (top)
The the first thing I saw when walking through the barn door was this old roller. I explored it from all angles – walking round it several times and took lots of pictures, but it was the front view that really interested me. I moved right in to crop out all the surroundings. I also set my WB (White Balance) to Cloudy. This added more yellow and emphasized the orange paint and reddish rust of the subject
Photograph2
 I also photographed the roller’s steering wheel and seat, but this time I used some flash to give harder, crisper lighting.
 Photograph 3

As part of my exploration of this subject, I decided to use some flash off the camera. It’s harder, more direct light would add more shadows and impact to the picture. I shot several different angles. This time the shutter speed was speeded up to 1/3sec in order to cut down the daylight coming in through the door and the hole in the roof of the barn. I didn’t even connect the flash with a synch cable to the camera, I simple pressed the button and fired the flash immediately - while the shutter was open. This takes a bit of practise when using anything less than one second, but saves messing around with cables. Okay, so I’m lazy.



