My good friend and student Ken Terry - a wizard with technical stuff - tells me that a new version of Adobe Lightroom is now available.
Ken says it has new features like dodging and burning. It uses the adjustment brush for all that and for altering the sharpness and saturation. He says the dodging tool is fantastic and that it is possible to use a brush without going beyond the subject's perimeter.
What particulaly interests me is that there have also been improvements in the facility for keywording.
Find out more at http://www.photoshopuser.com/lightroom2
31 Jul 2008
Adobe Lightroom 2
25 Jul 2008
Marine photography
This picture was taken at the entrance to Scarborough in Yorkshire. It was a very easy picture to capture especially as the sky and the light were so dramatic. Of course I pressed the button a couple of times as the fishing boat rolled into the harbour entrance. I was using a Nikon F3 film camera, so there was none of this '8-frames-a-second' stuff. I just had to wait for just the right moment. The boat was moving very quickly in order to maintain steerage in the rolling waves.
Of the two shots taken, I prefer this one because it has such a tremendous feeling of movement. The bow of the boat is just about to go out of shot and that has injected a sense of depth to the composition. Of course the use of a 24mm wide angle lens has accentuated this effect by exaggerating the perspective of the harbour wall.
PHOTOFACTS:
Camera: Nikon F3
Lens: Nikkor 24mm f2.8
Film: Fujichrome 100
Exposure: 1/125th f8
23 Jul 2008
Camera obscura
I sailed into Douglas on the Isle of Man recently and it was very pleasant to have fine weather for a change it didn't take long to deteriorate again, though. I took the opportunity of that lovely evening light to explore Douglas Head a high promontory above the harbour taking my Canon G9, of course. There are spectacular views down into the harbour and over the town, but something else caught my eye almost immediately. It was the recently renovated Great Union Camera Obscura building, which sits high on a cliff side above the sea looking out across Douglas Bay.
I just loved the way the light was catching the angles of the roof. In fact this roof was the first thing I photographed; cropping in really quite tightly and leaving just a little of the distant town in shot in order to put the picture in context.
Only when I'd got this picture in the bag did I step back a little and look at the overall scene. This time I placed the building squarely in the middle of the composition but included a foreground of the side lit grass in order to add some depth to the picture.
Camera obscuras were very popular during Victorian times, although the optical principle had been understood for centuries. Usually, a single lens and mirror was placed in a revolving turret above a darkened room. This set-up projected a live image of the surroundings. The lens was often revolved by an operator to amaze the audience with the most interesting view. The Douglas camera is different in that it has 11 fixed lenses originally there were 12 projecting the panoramic view onto a series of angled white boards in the darkened circular room below.
It was built in 1892 by a Mr Fielding, a Rochdale man, purely as a commercial enterprise. Eventually it fell into disrepair until the Manx government had it restored. It is now run by keen volunteers and is well worth a visit especially if you have an interest in photography.
Photo facts…
The G9 was set at ISO 80. Auto White Balance was used, and the exposure was set to f7.1 with Aperture Priority.
10 Jul 2008
Photographing shadows
Include shadows in your photographs and can show graphically, or express more subtly, anything from lead-in lines, texture, atmosphere, angular or curvaceous shapes, narrative or mystery.
Shadows can be used as subjects by themselves, or as devices to add interest and leading lines within your composition. Take a look at the picture of the door knocker (below) for example; the shadow forms a major part of the composition. Without it the picture would be very ordinary; a simple record of an object. But the shadow of the brass knocker extends across a large part of the left side of the picture – it has been used not only to accentuate the shape of the knocker and the door nails, but as a compositional device.
Mystery? Well, yes, include only the shadows of people and this can inject a powerful feeling of something or someone unseen; a suggestion of what the person might look like, but without the whole subject revealed plainly. That in itself makes the viewer of your picture look again and try to see more. People are always curious about people so if they cannot see the full features of the subject they are left with their curiosity unsatisfied. This can create a visual puzzle without the answer – and that becomes intriguing.
So what about the practicalities of including shadows in your photographs? How do you arrive at the correct exposure, for instance? Well, I’ve never believed in making difficulties where there are none, and taking pictures of shadows is no exception. As a rough and ready guide, just remember that if you want your shadows to be darker, you should expose for the brighter areas in your picture. It’s as simple as that. But don’t overdo this or your pictures will be underexposed and have a lifeless appearance. The other thing to be aware of is that shadows can register as very high colour temperature – they appear blue – when they are cast by a bright sun in a clear blue sky. So you may want to try the ‘Cloudy’ White Balance (WB) setting to counteract this. But this will depend on the effect you are trying to achieve.
 For those of you who are a bit nervous about taking pictures of people, photographing other people’s shadows can come as quite a relief. You will no longer need to point your camera directly at your subject, who is likely to remain quite unaware of what you are doing. Pictures that include the shadows of people – without actually showing the people themselves, encourage the viewer of the photograph to interpret a story or narrative into the image. They must ask themselves what the people are doing, what they might be saying or discussing – and that’s when a sense of mystery can be intoduced into your photographs (see photograph at top).
 5 Jul 2008
Low ISO speed

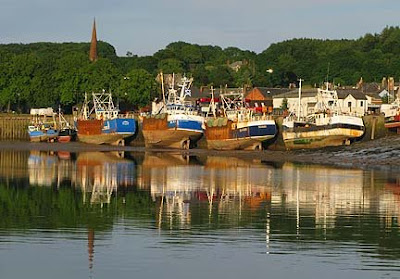
I've just arrived back in my home port of Kirkcudbright aboard my boat Moonshadow. Almost the first thing I did was reach for my little Canon G9 and take a picture. It was late afternoon and the light had that special brilliance. It was shining full belt onto the scallop fishing boats standing high and dry in the mud alongside the harbour wall at low water. The resulting picture would have been better if the water had been totally smooth in order to give perfect reflections. Unfortunately there was just a hint of a breeze and this has ruffled the surface of the water a little, breaking the reflections.
But never mind, I like the deep colours that have been accentuated by the front light and the contrast of the greens, blue and rusty reds.
Like I've said before - boating and photography are the perfect combination.
I set the G9 on aperture priority at f7.1. This gave me a shutter speed of 1/200sec at ISO 80 - remember, it's always best to use the slowest ISO possible for best quality. There was plenty of light, so ISO 80 was ideal. I used centre-weighted metering mode. The exposure compensation was set to minus 1/3 and the white balance on AWB. I was zoomed in to give me an equivalent focal length of around 85mm.


