TIP
Here in SW Scotland the tides can be very high, fast and strong. Be safe – check the tide times so that you don’t get stranded on sand banks on a rising tide. Try to time your photography for the falling tide when the water level is falling.
Buy a local tide table, or check on tides at the BBC website: http://www.bbc.co.uk/weather/coast/tides
TIP
Use your fingers
Even the best autofocus system can be a little confused when photographing water, you may find that it ‘hunts’ for something to focus on. Be prepared to resort to the tried and tested method – manual focus. Use your fingers on that focusing ring. If you are photographing a landscape scene and using a wide angle lens, you may find it difficult to manual focus accurately – so use the distance scale on your lens – if you have one. If you set this scale to just less than ‘infinity’ and use a small aperture, perhaps f11 or less, the wide angle lens’s extra depth of field should ensure you get most of the scene in focus.
TIP
Remember those basic rules of light…
Frontlight – Reveals colour – good for the straighforward reflections.
Sidelight – emphasizes texture and form.
Backlight – reveals outline shapes – like silhouettes.
Toplight – go have a beer!
Top photograph
Do not get carried away by the wonderful sounds of the estuary. The haunting call of the curlew does not photograph very well – you need to record only visual information in your camera, and this picture contains lots. The hull of the boat is in pretty low, non-directional light, and this has helped show more colour than texture. The rusty ladder leans at an angle that counteracts the lines of the planking, and the focal point, the sky, is a mass of bold colour. The camera was put on a tripod, a slow shutter speed (1/8sec) and a small aperture (f16) was used to gain maximum depth of field
Photograph 2
It is late afternoon and the last glimmer of sun just catches the superstructure of this scallop dredger as it heads down river and out to sea. I have not tried to counteract the extremely high temperature blue light, but kept the White Balance (WB) setting on the daylight (Sun) setting. This has had the effect of washing the whole scene – except the dashes of yellow sun on the boat – with blue
Photograph 3
Always be alert to those moments that just happen, and don’t get so wrapped up with one type of shot that you ignore everything else around you. When the lifeboat appeared going flat out down river, I stopped photographing the river bank for a few moments, took a couple of pictures of the lifeboat, then carried on with what I was doing
Photographs 4 & 5

Explore each subject carefully and take lots of pictures. Don’t be afraid to return to the same subject if possible to photograph it in different light or tide conditions. In this case, I photographed the boat’s reflection at high water, and returned when the tide was out to take more details.
Showing posts with label WB. Show all posts
Showing posts with label WB. Show all posts
26 Aug 2008
Photography down river - part 2


10 Jul 2008
Photographing shadows

Narrative and mystery – by including just the shadows of the two people, viewer are encouraged to interpret the picture in their own way. What are the two people saying? What is going on? It looks as though the larger figure is giving the smaller one a dressing down – and that the horse is joining in the conversation. All nonsense, of course, but an expample of the sort of ‘storyline’ that that be introduced when using shadows
Include shadows in your photographs and can show graphically, or express more subtly, anything from lead-in lines, texture, atmosphere, angular or curvaceous shapes, narrative or mystery.
All these things are possible when you use shadows. It is the combinations of shadow and light that produces the illusion of texture and form within the two-dimensional images we produce. Shadows can be subtle and diffused in soft, high quality light, or, if the light source is small and intense, they can have crisp, sharp outlines totally devoid of detail. A typical example of this might be the sun in an empty blue sky, or perhaps the light from an undifused flash.
Shadows can be used as subjects by themselves, or as devices to add interest and leading lines within your composition. Take a look at the picture of the door knocker (below) for example; the shadow forms a major part of the composition. Without it the picture would be very ordinary; a simple record of an object. But the shadow of the brass knocker extends across a large part of the left side of the picture – it has been used not only to accentuate the shape of the knocker and the door nails, but as a compositional device.
Mystery? Well, yes, include only the shadows of people and this can inject a powerful feeling of something or someone unseen; a suggestion of what the person might look like, but without the whole subject revealed plainly. That in itself makes the viewer of your picture look again and try to see more. People are always curious about people so if they cannot see the full features of the subject they are left with their curiosity unsatisfied. This can create a visual puzzle without the answer – and that becomes intriguing.
So what about the practicalities of including shadows in your photographs? How do you arrive at the correct exposure, for instance? Well, I’ve never believed in making difficulties where there are none, and taking pictures of shadows is no exception. As a rough and ready guide, just remember that if you want your shadows to be darker, you should expose for the brighter areas in your picture. It’s as simple as that. But don’t overdo this or your pictures will be underexposed and have a lifeless appearance. The other thing to be aware of is that shadows can register as very high colour temperature – they appear blue – when they are cast by a bright sun in a clear blue sky. So you may want to try the ‘Cloudy’ White Balance (WB) setting to counteract this. But this will depend on the effect you are trying to achieve.
 For those of you who are a bit nervous about taking pictures of people, photographing other people’s shadows can come as quite a relief. You will no longer need to point your camera directly at your subject, who is likely to remain quite unaware of what you are doing. Pictures that include the shadows of people – without actually showing the people themselves, encourage the viewer of the photograph to interpret a story or narrative into the image. They must ask themselves what the people are doing, what they might be saying or discussing – and that’s when a sense of mystery can be intoduced into your photographs (see photograph at top).
27 May 2008
Photography student's success

Photograph by Margaret Laurie
It’s always a huge pleasure for me when I hear that I have been able to inspire someone and set them on the right track.
Margaret came to one of my weekend workshops here in Kirkcudbright in SW Scotland earlier this year. The other day she emailed me hardly able to contain here excitement because one of her photographs had been accepted for publication in the Scotland on Sunday newspaper. This is what Margaret said:
“You helped a lot to inspire me to take more photos, and give me some confidence to send my photos into the paper.
“This photo was taken a couple of Fridays ago at the beginning of May. We live in Ferryhill, Aberdeen and I'd woken early with the sun streaming in through the window, and out of the window saw this fantastic sunrise. I went across the road and that was the view from our street at 5.30am! I took loads of photos while my husband, and daughters were tucked up snugly in bed. The view looks over the rooftops towards the River Dee as it flows under Victoria Road bridge to the harbour then out to sea. The smoke on the right is from an offshore supply vessel. The cranes are all at the docks and the tiny dots are notorious Aberdeen seagulls! I loved the way the cranes and the aerials were leaning towards each other.
“My camera is a Nikon D80, exposure set on manual at 1/1600sec, f7.1, ISO 200, WB set on ‘Cloudy’. The focal length was 112mm.
“The weekend workshop in Kirkcudbright with yourself gave me the oomph to do something with my photos. As you can see I now use my camera in manual, and that's pretty much 99% of the time, and experiment with the white balance, and still take B & W.”
Very well done, Margaret. You have every right to be very proud of yourself. I can still remember the buzz I got from my first publication – and that’s a very long time ago.
Might I have done things differently? Well, perhaps I might have used a slightly different exposure setting, but Margaret has achieved such a beautiful result that any alterations would only amount to fine tweaking.
By using the ‘Cloudy’ White Balance (WB) setting, Margaret has added to the yellow/orange glow from the early morning sun. Great idea. With so much light available, I might have used a ISO 100 for maximum image quality, stopped the aperture down for extra depth of field (this part depends on what Margaret was wanting to capture; maybe she wanted limited depth of field), and used a slower shutter speed. This would have given an exposure of roughly 1/500sec at f11. 1/500sec should be quite fast enough to eliminate camera shake when using a lens with a focal length of 112mm – which on the Nikon D80 is equivalent to about 180mm.
Keep ‘em coming, Margaret. Very well done!
10 Apr 2008
Photographing still life

Still life is definitely one of the best ways to make a start with creative photography. Even if you intend to spend all your time out photographing people or landscape, you can learn a very great deal right there at home even before you step outside your front door.
You will be able to work by yourself at your own pace, so you will be under no pressure. It can teach you so much – about light, composition, exposure, lens focal length and depth of field. And that’s just for starters. You can practise using simple backgrounds and combining different colours and textures; you will be able to hone your basic camera technique and get used to handling your camera and tripod to the point when it all becomes second nature. To top all this – it can produce some really beautiful photographs.
You do not need a studio with expensive lighting set-ups to produce interesting still life photographs. A kitchen table; spare room; a garage or even an old shed? Provided you’ve got enough room in there to put up a tripod, it will do just fine. Ideally the space will have a window that does not get direct sunlight, but even this can be softened to some degree by taping a couple of layers of net curtain or sheet of tissue paper over the window. Even an ordinary tungsten lamp can be used as your light source, but you will have to set your white balance to ‘Tungsten’ to correct any nasty orange colour casts from this low temperature light source.
In your makeshift ‘studio’ you will have total control of your subject, your composition and lighting. You will be able to choose your own backgrounds and decide on your own props. You will be able to mix and match colours and spend as much time as you feel you need to create the picture you want. The best way is to experiment and move your chosen objects around until you feel you have completely exhausted every last possibility.
The great joy of using digital is that you can review your results constantly and make adjustments as you go along. This means that your camera becomes a real learning tool and you can delete anything that is obviously not working.
Top photograph:
I’ve used a piece of wood and coil of blue rope to contrast with the elegant shape of a tall, unglazed vase. Positioning of the main object is crucial to the overall effect. It is off-centre and overlaps the rope. This helps the ‘layering’ effect of the objects and creates a sense of depth. This is also helped by the soft sidelight coming in through my shed window
Lower photograph:
This picture was spotted in a potter’s workshop. I did move a plastic bag that was in the background. I also pulled the bird on the right to hand side over the edge of the bench. This broke the otherwise straight line and created an illusion of depth. I was very careful not to disturb the layer of clay dust that covered the bench and the pot pheasants

Next – in part 2 - I’ll show you how I modified a few props to make my still life photography more effective
25 Mar 2008
How to photograph moving water - part 2

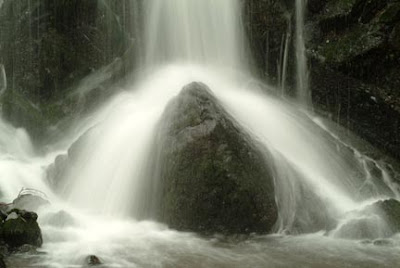
These two picture show just how easily you can allow your viewer’s eye to drop off the bottom of your composition. There are no hard and fast rules here, but generally, white or light areas in your picture will attract the eye – like a moth to light. So if you leave a bright white area at the edge of your frame – at the sides, top or bottom - your viewer’s eye will be attracted to it. Often it will not come back into the picture and the viewer will lose interest. The eye has a tendency to do this in the top photograph which has an intense white area at the bottom edge.
In the lower photograph I have moved the camera back a little to take the white area back into the frame and away from the lower edge of the composition. This darker foreground ensures that the viewer’s interest does not drop away. However, I do find the rock at the bottom of the shot just a tad distracting.
WHITE BALANCE
A word about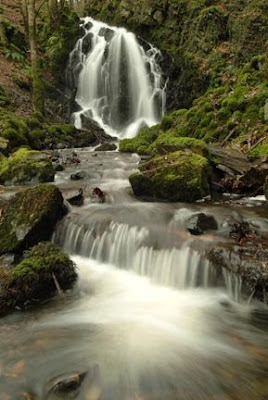 white balance here when photographing this type of subject. In this situation the waterfall was in the shade of a deep ravine. That meant high temperature blue light. By all means experiment with your White Balance (WB) settings, but I tend to avoid Auto White Balance (AWB) in these situations because it can be difficult to achieve consistency between each shot due to the fluid ‘self-adjusting’ nature of the AWB mode - it can change the colour of your picture by very small degrees each time you adjust your composition. I found that setting the camera on the ‘cloudy’ white balance icon gave exactly the tones I wanted without making the water look too yellow. Using these WB icons, or indeed setting a Custom White Balance, locks the white balance on that particular setting, so the colours should not change between frames.
RECTANGLES
In the lower photograph I have moved the camera back a little to take the white area back into the frame and away from the lower edge of the composition. This darker foreground ensures that the viewer’s interest does not drop away. However, I do find the rock at the bottom of the shot just a tad distracting.
WHITE BALANCE
A word about
 white balance here when photographing this type of subject. In this situation the waterfall was in the shade of a deep ravine. That meant high temperature blue light. By all means experiment with your White Balance (WB) settings, but I tend to avoid Auto White Balance (AWB) in these situations because it can be difficult to achieve consistency between each shot due to the fluid ‘self-adjusting’ nature of the AWB mode - it can change the colour of your picture by very small degrees each time you adjust your composition. I found that setting the camera on the ‘cloudy’ white balance icon gave exactly the tones I wanted without making the water look too yellow. Using these WB icons, or indeed setting a Custom White Balance, locks the white balance on that particular setting, so the colours should not change between frames.
RECTANGLES
Once again I have explored the subject by breaking it down into a series of simple rectangles, and the two bottom photographs show just how different the framing can be of the same subject – if you think in rectangles. In this case, one horizontal and the other vertical. Remember, explore your subject – look for those rectangles. Your output of good photographs will multiply and you will come away from every location knowing that you have gathered every good picture that could be taken.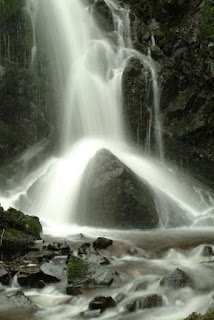


Subscribe to:
Posts (Atom)