31 Aug 2008

A career in photography - 4


It’s some time now since I posted an instalment of this story about how I got started as a professional photographer (click here to read part 3). In that post, I explained that I realised how much I needed contacts in the business if I was to gain a foothold on the first rung of the ladder. I was a 14 year old kid with ambition - but I knew no one in the business. So I set about changing all that…


The letter that dropped on the doormat was from Mr Percy Broome, FRPS (Fellow of the Royal Photographic Society). I was so keen to open it I nearly ripped the envelope in two.

After my talk with Dad some months before about the need to get to know someone involved with photography, I enrolled for night school classes. Not only would I learn more about photography that way, but night school just might bring me into contact with someone who could help me break into local newspapers. The scale of this commitment can be judged by the fact that the night school classes were held in the same school I went to during the day and that meant retracing my steps to school two evenings a week for six months.

At night school, or evening classes as they are sometimes called these days, I learned about the characteristics of different films and developers; Percy Broome, the tutor, demonstrated darkroom techniques and how to make high quality black and white prints from my negatives, he instilled in me an understanding of shutter speeds and lens apertures - and he didn’t laugh when I told him about my ambitions to become a professional photographer. A former police sergeant, gruff and plain-speaking, Percy had an artist’s eye and he encouraged me to photograph local events. He assured me that if I was good enough I would reach the top. His no-nonsense tuition was so successful that, several months before I left school, I had my first publication in a newspaper, The Manchester Evening News – a picture of a little boy and his pet at a dog show - and I received my very first publication fee – three pounds, thirteen shillings and six pence. Believe me, that was a good price in the early sixties.

Percy also knew the chief photographer on the local weekly newspaper. There was no such thing as ‘work experience’ in those days, but Percy persuaded this chap to let me spend a Saturday with one of the newspaper’s staff photographers while as he went about photographing weddings, bring-and-buy sales and coffee mornings. I got on well with the photographers I went out with, and those Saturday outings with them became a major part of my life. Somehow I managed to get through each week at school - just longing for Saturdays to come round.
I learned everything I could from every situation, I took countless photographs, learned how to handle a 5 inch x 4 inch glass plate press camera. Above all else, I learned how to persuade reluctant subjects to have their photographs taken, and how to deal with people at every level... vital requirements for any professional press photographer.
Percy’s letter read:

Dear Philip,
Present yourself at the Advertiser office at 9 o’clock sharp on Saturday 21st April. Mr. George Greenhough, the chief photographer, is expecting you.
You may be allowed to accompany a photographer on assignments and you might travel by bus – so have some money in your pocket for bus fares. Take your camera with you.

Don’t be late! Keep you mouth firmly closed and your ears and eyes wide open!
Look! Listen and Learn!
Yours,
Percy Broome, FRPS


I knew I was on my way to Fleet Street.

Above is a picture of a cutting of my first publication. The negative is long lost. The cutting is now very discoloured and fragile, but it is from The Manchester Evening News in 1962!

26 Aug 2008

Photography down river - part 2

TIP
Here in SW Scotland the tides can be very high, fast and strong. Be safe – check the tide times so that you don’t get stranded on sand banks on a rising tide. Try to time your photography for the falling tide when the water level is falling.
Buy a local tide table, or check on tides at the BBC website: http://www.bbc.co.uk/weather/coast/tides

TIP
Use your fingers

Even the best autofocus system can be a little confused when photographing water, you may find that it ‘hunts’ for something to focus on. Be prepared to resort to the tried and tested method – manual focus. Use your fingers on that focusing ring. If you are photographing a landscape scene and using a wide angle lens, you may find it difficult to manual focus accurately – so use the distance scale on your lens – if you have one. If you set this scale to just less than ‘infinity’ and use a small aperture, perhaps f11 or less, the wide angle lens’s extra depth of field should ensure you get most of the scene in focus.

TIP
Remember those basic rules of light…
Frontlight – Reveals colour – good for the straighforward reflections.
Sidelight – emphasizes texture and form.
Backlight – reveals outline shapes – like silhouettes.
Toplight – go have a beer!

Top photograph

Do not get carried away by the wonderful sounds of the estuary. The haunting call of the curlew does not photograph very well – you need to record only visual information in your camera, and this picture contains lots. The hull of the boat is in pretty low, non-directional light, and this has helped show more colour than texture. The rusty ladder leans at an angle that counteracts the lines of the planking, and the focal point, the sky, is a mass of bold colour. The camera was put on a tripod, a slow shutter speed (1/8sec) and a small aperture (f16) was used to gain maximum depth of field

Photograph 2


It is late afternoon and the last glimmer of sun just catches the superstructure of this scallop dredger as it heads down river and out to sea. I have not tried to counteract the extremely high temperature blue light, but kept the White Balance (WB) setting on the daylight (Sun) setting. This has had the effect of washing the whole scene – except the dashes of yellow sun on the boat – with blue


Photograph 3


Always be alert to those moments that just happen, and don’t get so wrapped up with one type of shot that you ignore everything else around you. When the lifeboat appeared going flat out down river, I stopped photographing the river bank for a few moments, took a couple of pictures of the lifeboat, then carried on with what I was doing


Photographs 4 & 5


Explore each subject carefully and take lots of pictures. Don’t be afraid to return to the same subject if possible to photograph it in different light or tide conditions. In this case, I photographed the boat’s reflection at high water, and returned when the tide was out to take more details.

21 Aug 2008

Photography down river - part 1


Water has always inspired photographers to reach for their cameras. Sunsets dipping into reflective seas, waterfalls, fountains – the possibilities are endless. My favourite watery locations are tidal estuaries and rivers, and I’m lucky enough to live near the beautiful River Dee in Galloway. My students love the area, too. However, all tidal rivers, whether they are industrial or rural, can draw me like a magnet. That soft morning or evening light bouncing off rippled water; undulating muddy river banks; fishing boats setting off to sea or heading home after a long trip… just some of the subjects that have me spending many happy hours exploring the river banks.

The River Dee has a huge tidal range, often 8 metres or more, and at low water an entirely different scene is revealed. I’m not in the least put off by all that mud and exposed sand – it is sure to present me with wonderful picture opportunities. At low water the mud shines silver and vibrant – especially when you shoot into the light. This is the time to look for different shapes and textures in the wet surfaces.

Unless you are aiming for a totally abstract feel to your picture, try to use some readily identifiable object as a focal point or foreground – perhaps a wooden stake, a clump of reeds or a boat. Without this, your picture can be confusing to the viewer, who can easily be disorientated with little visual information to go on. For example, an image full of nothing but mud ripples stretching into the distance can lack a sense of scale and impact… again, I stress that that is fine if you are aiming for abstracts. Personally I find, in many instances, these sort of images are unrewarding.

Sensitive use of light is probably the most important asset when trying to produce evocative images of wide-open rivers. Of course, if you can stir yourself to be in position at dawn, you may be rewarded with the most glorious soft light peeping through the sort of hazy, low-lying mist that creeps silently in with the tide. Do not waste these opportunities. Take pictures as if your life depends on it. Explore each and every subject thoroughly. Do not be afraid to shoot straight into that light. This will not only illuminate the mist, but will bring contrast and texture to the surfaces of the water and mud.

Keep alert for everything that happens on and alongside the river. Everything will be changing all the time, and it is a common mistake to get so focused on one particular type of picture that you miss those fleeting opportunities – when the fishing boat appears through the mist, or a flock of waders take flight.
Top photograph
It is simple enough to capture moments like this provided you stay aware of what is going on around you and anticipate what might happen next. I had watched the lobsterman moor his boat in the middle of the river and row ashore in his dinghy. Obviously he had to walk up that muddy river bank. I took lots of pictures of everything that happened , but this is the one I liked best because it seems to sum up the atmosphere of the riverside town and the man heading home after his day’s work

Photograph 2


Always be on the lookout for reflections in still water. It would have been a great mistake to crop off the bottom of this picture because it contains so much visual information. The soft sidelighting and threatening clouds have certainly helped create atmosphere, but those reflected masts have given the picture its appeal


Photograph 3


I took lots of pictures to record this special morning light as the mist rolled up the river. In this picture, I have included a clump of grass in the foreground and, combined with a wide angle lens, this has induced a tremendous feeling of distance. Mist always photographs really well when it is backlit like this, and that backlight also reveals the texture of the mud. Using Centre-Weighted Exposure mode, I took my exposure reading from just above the grass to the right side. This has underexposed the grass and created bold dark shape


Photograph 4


Remember the mantra – backlight to emphasize outline shapes! In this case the old wooden mooring piles have been completely silhouetted against a sunset. The exposure reading was taken from the sky
NEXT... more tips and more photographs about photographing rivers

18 Aug 2008

Photographing junk - part 2

When I am faced with the enormous array of picture possibilities to be found in this old barn, I find it best to pick off each picture one at a time and move on to the next subject only when I feel Ihave captured what Iset out to achieve. Explore each subject thoroughly and be prepared to move in close to pick out details. These close-ups can make fascinating images, especially when you are photographing old and weathered tools and implements.

Moving further inside the barn and away from the door, it got much darker. But this just meant using slower shutter speeds. There is absolutely no reason why you need use a wide aperture in these low light conditions – provided you are using a good firm tripod. For most of my shots I set the aperture to around f11 or f16 and used shutter speeds ranging from 1 or 2 seconds. Be patient when waiting to check your image in the LCD, processing usually takes a little longer when you have used a slow shutter speed.

For many of my pictures I used a slow shutter speed and let off a hand-held flash. Sometimes firing the flash several times from different directions and positions while the shutter was open.
Read more about this The flash does not need to be connected to the camera in any way: a very basic technique that can create beautiful light if done well – experiment. It costs nothing.

If you'd like the opportunity to photograph the wonderful contents of this old barn, it is sometimes - not always - possible when you come to me for one-to-one tuition. See my website for more details

Top photograph
I moved some other implements that were hanging on these same hooks. This was done to keep the shapes simple. When shooting at a white wall like this, your exposure metering can easily be confused by all that white and give you a reading that will under expose. Use you Exposure Compensation function to increase the exposure by up to one stop. If, like me, you only ever use the Manual mode, simply over expose by a similar amount

Photograph 2


I liked this old wooden boat resting on the pram wheels. I actually wanted to show the whole boat, but it was in a cramped corner of the barn surrounded by other objects. A very wide angle lens would have distorted the shape too much so I contented myself with having to cut of the stern of the boat


Photograph 3


The Ski-Lark has been in this barn since the 1960s, gathering more and more junk around her – a tin bath, milk churn and a mildewed tarpaulin. It was the combination of greens and blues that attracted me. I simple put the camera on the tripod with an exposure of 1sec at f9.5 and used the available light that was filtering down from the roof


Photograph 4


Don’t forget to explore each subject critically – The Ski-Lark was resting on a very old trailer, and I noticed the flat tyres and rusty springs. This time I needed to put a white reflector beneath the camera (just out of shot at the bottom of the picture) to reflect some light back upwards to show some detail in the shadows

Photograph 5
I did no re-arranging whatsoever with this picture. I did not want to disturb the dust and leaves on the floor – it might have taken years for them to get like that. No flash, no reflector, no tricks. Just a straightforward image with loads of nostalgic interest


Photograph 6

This saw wheel was in a very dark corner of the barn. In order to pick out the outline shape of the curved blade, I simple fired a flash behind the wheel facing towards the camera... remember - backlight accentuates outline shapes. I debated whether or not to remove the bright green nettle. In the end I decided I quite liked the splash of colour

17 Aug 2008

Photographing junk - part 1


Beauty, they say, is in the eye of the beholder – well, I find old junk a constant source of inspiration.

Give me a barn full of old tat and I’m in heaven. Problem is, so many people just throw their old stuff out before I get around to photographing it. Fortunately there’s a retired farmer near my home in Galloway who still has a treasure chest of rusty old implements and tools in his barn. Hopefully he’ll never get rid of it and I’ll be able to keep going back to take pictures. I sometimes take my students there, but it’s best if they are on the same wavelength if they are to get the full benefit from the place.

There are old boats that haven’t seen the water since the 1960s, a road roller of similar vintage, farm implements hung on the walls and scattered around the floors, saws, spanners, you name it. There are colours, shapes, textures and heavy doses of nostalgia everywhere you I look.

When you are confronted with so many photo opportunities like this, it’s always best to take a good look around first and work through the place methodically with some outline plan about what you want to achieve. This way you won’t be stumbling around aimlessly trying to pick off pictures here and there. You’ll have a system.

I started just inside the doorway where I used the available natural light with the camera on my solid Benbo tripod. I photographed an old boat and the road roller. If possible, always walk all the way around the objects that catch your eye – ask yourself what it was about them that attracted you and then try to accentuate that aspect. Is it the colour, for instance, the texture, outline shape? Perhaps the object tells a story – like the wooden boat resting on the pram wheels. Whatever it is you must try to maximise it in order to bring impact to each picture.

There is no need to hurry in these situations. You can enjoy every minute, so take your time and consider each picture angle carefully. The light is unlikely to change dramatically, so again this will not put you under any pressure. Take a good big white reflector with you so that you can direct some light into the shadows, or even bounce your flash off it. There are endless possibilities once you get started.

Photograph 1 (top)
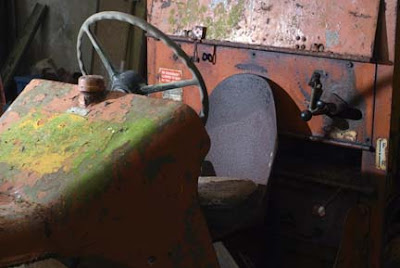
The the first thing I saw when walking through the barn door was this old roller. I explored it from all angles – walking round it several times and took lots of pictures, but it was the front view that really interested me. I moved right in to crop out all the surroundings. I also set my WB (White Balance) to Cloudy. This added more yellow and emphasized the orange paint and reddish rust of the subject

Photograph2
I also photographed the roller’s steering wheel and seat, but this time I used some flash to give harder, crisper lighting.


Photograph 3
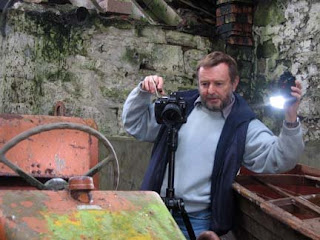
As part of my exploration of this subject, I decided to use some flash off the camera. It’s harder, more direct light would add more shadows and impact to the picture. I shot several different angles. This time the shutter speed was speeded up to 1/3sec in order to cut down the daylight coming in through the door and the hole in the roof of the barn. I didn’t even connect the flash with a synch cable to the camera, I simple pressed the button and fired the flash immediately - while the shutter was open. This takes a bit of practise when using anything less than one second, but saves messing around with cables. Okay, so I’m lazy.

16 Aug 2008

Video with Canon G9

You may be pleased - or maybe not - to know that my posts will again be getting more regular as I am now back home after my 'summer' sailing. I thought I might just give you one more blast of salt air by embedding a very short seafaring video here. It shows my boat Moonshadow rounding the notorious Mull of Galloway in SW Scotland. This headland can be a very nasty place to be in bad weather. On this trip there was little or no wind. Even so, the tide was whipping along and giving me a speed of 11.9 knots - that's a lot in a sailing boat.

The video was shot on my Canon G9 and, even considering the loss of quality of YouTube compression, it has done a pretty good job.

You will notice that some filming techniques are exactly the same as those used for stills photography. Towards the end, notice the slight lowering of the shooting angle in order to get a clearer view of the distant headland between the gear on the back of the boat. This is followed by zooming back to view the wider scene including the foreground - with stills photography, the shutter button would have been pressed to take a picture at each separate stage.


And for those of you who love shooting sunsets - the video finishes with a really spectacular one. We carried on sailing into the night.

11 Aug 2008

Words in photographs

Words in pictures
Okay, I admit that some of you who have been to me for tuition might have heard me say that I do not normally like photographs whose only claim to any sort of appeal is an obvious printed message. Some people like this sort of thing. I'm definitely not a fan.
However, any photographer shooting for stock, in fact any professional freelance photographer, would be a fool to pass by an opportunity to capture a silly, but sellable, photograph like the one above these pictures can make money. And this one has done just that.
The picture has no artistic visual merit whatsoever, the camera has simply been pointed and the button pressed. Little time and effort was spent on it. Its message and humour (if you like that sort of humour) is entirely in the written sign behind the tethered cow. It is a good example of how a photographer who needs to make a living from his camera should often put his own personal views to one side in order to turn a penny and pay the mortgage.
Photographers who get sniffy and 'precious' at this sort of thing are often financially poor photographers out of touch with the realities of life. In fact, I've been quite happy to label myself as a 'panchromatic prostitute'. I take pictures for money. The fact that I love doing it is a tremendous bonus.
It's worth mentioning that the picture was taken while I was working on a major commission to cover the Royal Agricultural Show for a government publicity department. They would not want this type of image but I knew plenty of people who would.
It is wonderful to work for people who want to stretch my artistic skills and journalistic experience, and I have been fortunate to have worked for many such people over the years. These commissions are to be enjoyed to the full but I've always found it profitable to keep my eyes open for the less glamorous shots while I'm at it.
I get many aspiring professional photographers coming to me and wanting to know how to make a living from their hobby. Some have very grand ideas of how they should go about things. That's fine, but I like to show them a picture like this first so that they start off with their feet on the ground.

2 Aug 2008

Photographic viewpoints


I suppose photographers might be roughly separated into two types – those who, when they spot a vantage point, and assuming they are able, simply have to climb up it to see what the view is like from the top, and those who can’t be bothered. I’ve spent a lot of my working life as a travel photographer climbing up hillsides, towers, walls, stairs, onto rooftops and leaning out of upper floor windows. You simply never quite know exactly what you are going to see until you make the effort to get up there and look down on the world.

Of course, you can make an educated judgement of what you might see; you will certainly have looked around from ground level a judged the angles and the light, but the view from the top can often take you completely by surprise. The most wonderful scenes can be revealed and, best of all, the most intriguing pictures of people can be captured.

If it surprises you how few photographers bother to look down, it is even more surprising how few people ever bother to look up. That means the photographer who takes the trouble to find a high vantage point can often work very effectively without being spotted. If you are at all nervous about photographing people this can be a useful technique to try.

The picture above was taken in eastern Turkey. Several pony carts had trotted by and I had photographed them, but the background was very busy and distracting. Fortunately there was a small cliff face running alongside the road – the perfect vantage point – so I climbed to the top. The great benefit was that by looking down on the scene, I was able to eliminate all the background and show only the dusty road.

And did I say nobody ever bothers to look up? Well this eagle-eyed chap did – and gave me a friendly wave as he trotted by with his family.