17 Aug 2008

Photographing junk - part 1


Beauty, they say, is in the eye of the beholder – well, I find old junk a constant source of inspiration.

Give me a barn full of old tat and I’m in heaven. Problem is, so many people just throw their old stuff out before I get around to photographing it. Fortunately there’s a retired farmer near my home in Galloway who still has a treasure chest of rusty old implements and tools in his barn. Hopefully he’ll never get rid of it and I’ll be able to keep going back to take pictures. I sometimes take my students there, but it’s best if they are on the same wavelength if they are to get the full benefit from the place.

There are old boats that haven’t seen the water since the 1960s, a road roller of similar vintage, farm implements hung on the walls and scattered around the floors, saws, spanners, you name it. There are colours, shapes, textures and heavy doses of nostalgia everywhere you I look.

When you are confronted with so many photo opportunities like this, it’s always best to take a good look around first and work through the place methodically with some outline plan about what you want to achieve. This way you won’t be stumbling around aimlessly trying to pick off pictures here and there. You’ll have a system.

I started just inside the doorway where I used the available natural light with the camera on my solid Benbo tripod. I photographed an old boat and the road roller. If possible, always walk all the way around the objects that catch your eye – ask yourself what it was about them that attracted you and then try to accentuate that aspect. Is it the colour, for instance, the texture, outline shape? Perhaps the object tells a story – like the wooden boat resting on the pram wheels. Whatever it is you must try to maximise it in order to bring impact to each picture.

There is no need to hurry in these situations. You can enjoy every minute, so take your time and consider each picture angle carefully. The light is unlikely to change dramatically, so again this will not put you under any pressure. Take a good big white reflector with you so that you can direct some light into the shadows, or even bounce your flash off it. There are endless possibilities once you get started.

Photograph 1 (top)
The the first thing I saw when walking through the barn door was this old roller. I explored it from all angles – walking round it several times and took lots of pictures, but it was the front view that really interested me. I moved right in to crop out all the surroundings. I also set my WB (White Balance) to Cloudy. This added more yellow and emphasized the orange paint and reddish rust of the subject

Photograph2
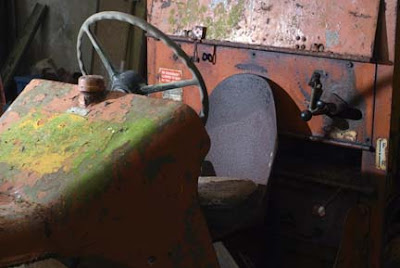
I also photographed the roller’s steering wheel and seat, but this time I used some flash to give harder, crisper lighting.


Photograph 3
As part of my exploration of this subject, I decided to use some flash off the camera. It’s harder, more direct light would add more shadows and impact to the picture. I shot several different angles. This time the shutter speed was speeded up to 1/3sec in order to cut down the daylight coming in through the door and the hole in the roof of the barn. I didn’t even connect the flash with a synch cable to the camera, I simple pressed the button and fired the flash immediately - while the shutter was open. This takes a bit of practise when using anything less than one second, but saves messing around with cables. Okay, so I’m lazy.

16 Aug 2008

Video with Canon G9

You may be pleased - or maybe not - to know that my posts will again be getting more regular as I am now back home after my 'summer' sailing. I thought I might just give you one more blast of salt air by embedding a very short seafaring video here. It shows my boat Moonshadow rounding the notorious Mull of Galloway in SW Scotland. This headland can be a very nasty place to be in bad weather. On this trip there was little or no wind. Even so, the tide was whipping along and giving me a speed of 11.9 knots - that's a lot in a sailing boat.

The video was shot on my Canon G9 and, even considering the loss of quality of YouTube compression, it has done a pretty good job.

You will notice that some filming techniques are exactly the same as those used for stills photography. Towards the end, notice the slight lowering of the shooting angle in order to get a clearer view of the distant headland between the gear on the back of the boat. This is followed by zooming back to view the wider scene including the foreground - with stills photography, the shutter button would have been pressed to take a picture at each separate stage.


And for those of you who love shooting sunsets - the video finishes with a really spectacular one. We carried on sailing into the night.

11 Aug 2008

Words in photographs

Words in pictures
Okay, I admit that some of you who have been to me for tuition might have heard me say that I do not normally like photographs whose only claim to any sort of appeal is an obvious printed message. Some people like this sort of thing. I'm definitely not a fan.
However, any photographer shooting for stock, in fact any professional freelance photographer, would be a fool to pass by an opportunity to capture a silly, but sellable, photograph like the one above these pictures can make money. And this one has done just that.
The picture has no artistic visual merit whatsoever, the camera has simply been pointed and the button pressed. Little time and effort was spent on it. Its message and humour (if you like that sort of humour) is entirely in the written sign behind the tethered cow. It is a good example of how a photographer who needs to make a living from his camera should often put his own personal views to one side in order to turn a penny and pay the mortgage.
Photographers who get sniffy and 'precious' at this sort of thing are often financially poor photographers out of touch with the realities of life. In fact, I've been quite happy to label myself as a 'panchromatic prostitute'. I take pictures for money. The fact that I love doing it is a tremendous bonus.
It's worth mentioning that the picture was taken while I was working on a major commission to cover the Royal Agricultural Show for a government publicity department. They would not want this type of image but I knew plenty of people who would.
It is wonderful to work for people who want to stretch my artistic skills and journalistic experience, and I have been fortunate to have worked for many such people over the years. These commissions are to be enjoyed to the full but I've always found it profitable to keep my eyes open for the less glamorous shots while I'm at it.
I get many aspiring professional photographers coming to me and wanting to know how to make a living from their hobby. Some have very grand ideas of how they should go about things. That's fine, but I like to show them a picture like this first so that they start off with their feet on the ground.

2 Aug 2008

Photographic viewpoints


I suppose photographers might be roughly separated into two types – those who, when they spot a vantage point, and assuming they are able, simply have to climb up it to see what the view is like from the top, and those who can’t be bothered. I’ve spent a lot of my working life as a travel photographer climbing up hillsides, towers, walls, stairs, onto rooftops and leaning out of upper floor windows. You simply never quite know exactly what you are going to see until you make the effort to get up there and look down on the world.

Of course, you can make an educated judgement of what you might see; you will certainly have looked around from ground level a judged the angles and the light, but the view from the top can often take you completely by surprise. The most wonderful scenes can be revealed and, best of all, the most intriguing pictures of people can be captured.

If it surprises you how few photographers bother to look down, it is even more surprising how few people ever bother to look up. That means the photographer who takes the trouble to find a high vantage point can often work very effectively without being spotted. If you are at all nervous about photographing people this can be a useful technique to try.

The picture above was taken in eastern Turkey. Several pony carts had trotted by and I had photographed them, but the background was very busy and distracting. Fortunately there was a small cliff face running alongside the road – the perfect vantage point – so I climbed to the top. The great benefit was that by looking down on the scene, I was able to eliminate all the background and show only the dusty road.

And did I say nobody ever bothers to look up? Well this eagle-eyed chap did – and gave me a friendly wave as he trotted by with his family.

31 Jul 2008

Adobe Lightroom 2

My good friend and student Ken Terry - a wizard with technical stuff - tells me that a new version of Adobe Lightroom is now available.

Ken says it has new features like dodging and burning. It uses the adjustment brush for all that and for altering the sharpness and saturation. He says the dodging tool is fantastic and that it is possible to use a brush without going beyond the subject's perimeter.

What particulaly interests me is that there have also been improvements in the facility for keywording.

Find out more at http://www.photoshopuser.com/lightroom2

25 Jul 2008

Marine photography

You probably know by now of my interest and involvement with boats and the sea. I try to spend as much time sailing as I can. Sailing and photography suit each other so very well because the one creates so many great opportunities to enjoy the other. Some years ago I sailed right round the coast of Britain in a 27ft sailing yacht, and I now have an archive of photographs showing harbours of Britain from Dover in Kent, to Newlyn in Cornwall, and Scrabster on the northern coast of Scotland.

This picture was taken at the entrance to Scarborough in Yorkshire. It was a very easy picture to capture especially as the sky and the light were so dramatic. Of course I pressed the button a couple of times as the fishing boat rolled into the harbour entrance. I was using a Nikon F3 film camera, so there was none of this '8-frames-a-second' stuff. I just had to wait for just the right moment. The boat was moving very quickly in order to maintain steerage in the rolling waves.

Of the two shots taken, I prefer this one because it has such a tremendous feeling of movement. The bow of the boat is just about to go out of shot and that has injected a sense of depth to the composition. Of course the use of a 24mm wide angle lens has accentuated this effect by exaggerating the perspective of the harbour wall.

PHOTOFACTS:
Camera: Nikon F3
Lens: Nikkor 24mm f2.8
Film: Fujichrome 100
Exposure: 1/125th f8

23 Jul 2008

Camera obscura

I'm sorry not to have been posting as regularly as normal, but I did mention some weeks ago that my summer sailing activities would make my posts a bit less frequent.

I sailed into Douglas on the Isle of Man recently and it was very pleasant to have fine weather for a change it didn't take long to deteriorate again, though. I took the opportunity of that lovely evening light to explore Douglas Head a high promontory above the harbour taking my Canon G9, of course. There are spectacular views down into the harbour and over the town, but something else caught my eye almost immediately. It was the recently renovated Great Union Camera Obscura building, which sits high on a cliff side above the sea looking out across Douglas Bay.

I just loved the way the light was catching the angles of the roof. In fact this roof was the first thing I photographed; cropping in really quite tightly and leaving just a little of the distant town in shot in order to put the picture in context.

Only when I'd got this picture in the bag did I step back a little and look at the overall scene. This time I placed the building squarely in the middle of the composition but included a foreground of the side lit grass in order to add some depth to the picture.

Camera obscuras were very popular during Victorian times, although the optical principle had been understood for centuries. Usually, a single lens and mirror was placed in a revolving turret above a darkened room. This set-up projected a live image of the surroundings. The lens was often revolved by an operator to amaze the audience with the most interesting view. The Douglas camera is different in that it has 11 fixed lenses originally there were 12 projecting the panoramic view onto a series of angled white boards in the darkened circular room below.

It was built in 1892 by a Mr Fielding, a Rochdale man, purely as a commercial enterprise. Eventually it fell into disrepair until the Manx government had it restored. It is now run by keen volunteers and is well worth a visit especially if you have an interest in photography.

Photo facts…
The G9 was set at ISO 80. Auto White Balance was used, and the exposure was set to f7.1 with Aperture Priority.

10 Jul 2008

Photographing shadows

Narrative and mystery – by including just the shadows of the two people, viewer are encouraged to interpret the picture in their own way. What are the two people saying? What is going on? It looks as though the larger figure is giving the smaller one a dressing down – and that the horse is joining in the conversation. All nonsense, of course, but an expample of the sort of ‘storyline’ that that be introduced when using shadows


Include shadows in your photographs and can show graphically, or express more subtly, anything from lead-in lines, texture, atmosphere, angular or curvaceous shapes, narrative or mystery.
All these things are possible when you use shadows. It is the combinations of shadow and light that produces the illusion of texture and form within the two-dimensional images we produce. Shadows can be subtle and diffused in soft, high quality light, or, if the light source is small and intense, they can have crisp, sharp outlines totally devoid of detail. A typical example of this might be the sun in an empty blue sky, or perhaps the light from an undifused flash.

Shadows can be used as subjects by themselves, or as devices to add interest and leading lines within your composition. Take a look at the picture of the door knocker (below) for example; the shadow forms a major part of the composition. Without it the picture would be very ordinary; a simple record of an object. But the shadow of the brass knocker extends across a large part of the left side of the picture – it has been used not only to accentuate the shape of the knocker and the door nails, but as a compositional device.

Mystery? Well, yes, include only the shadows of people and this can inject a powerful feeling of something or someone unseen; a suggestion of what the person might look like, but without the whole subject revealed plainly. That in itself makes the viewer of your picture look again and try to see more. People are always curious about people so if they cannot see the full features of the subject they are left with their curiosity unsatisfied. This can create a visual puzzle without the answer – and that becomes intriguing.

So what about the practicalities of including shadows in your photographs? How do you arrive at the correct exposure, for instance? Well, I’ve never believed in making difficulties where there are none, and taking pictures of shadows is no exception. As a rough and ready guide, just remember that if you want your shadows to be darker, you should expose for the brighter areas in your picture. It’s as simple as that. But don’t overdo this or your pictures will be underexposed and have a lifeless appearance. The other thing to be aware of is that shadows can register as very high colour temperature – they appear blue – when they are cast by a bright sun in a clear blue sky. So you may want to try the ‘Cloudy’ White Balance (WB) setting to counteract this. But this will depend on the effect you are trying to achieve.


For those of you who are a bit nervous about taking pictures of people, photographing other people’s shadows can come as quite a relief. You will no longer need to point your camera directly at your subject, who is likely to remain quite unaware of what you are doing. Pictures that include the shadows of people – without actually showing the people themselves, encourage the viewer of the photograph to interpret a story or narrative into the image. They must ask themselves what the people are doing, what they might be saying or discussing – and that’s when a sense of mystery can be intoduced into your photographs (see photograph at top).
