I've come across an interesting review of the Canon G9 today. You may remember I've just bought one of these little cameras and my initial response was not favourable. Firstly, I thought I detected a noticeable shutter lag, and secondly I found the optical viewfinder all but useless.
Well, a chap called Nick Devlin has been comparing it to his Leica M8.
Strangely enough, Nick found that - guess what? There's a shutter lag and the optical viewfinder is all pretty useless. Otherwise, it's a great little camera.
I'm looking forward to finding out by using it for myself.
Anyway, go take a look what Nick says...
http://www.luminous-landscape.com/reviews/cameras/G9-Japan.shtml
Also, my good friend and former student, Alwyn, wrote an interesting comment about the Canon G9. He, too, offered a link to a practical review...
http://www.imaging-resource.com/PRODS/G9/G9A.HTM
31 Jan 2008
More on the Canon G9
Photographing white on white - part 2
I have mentioned this before, but I’ll say it again – it is vital to ignore the light reading needle, or indicator, in the viewfinder when pointing the camera away from the area on which you have just set your light reading, and back at your white subject. Chances are that when you re-compose you picture on the white subject, the exposure meter pointer will now indicate over-exposure. Ignore it!
The biggest mistake my students make when doing this is to ‘chase the needle’ that is, they re-adjust the exposure when they point the camera back at their chosen subject and notice that the light reading says the subject is now over-exposed… that over-exposure is precisely what you do want. If you want to use this method with an auto exposure mode, you must lock the exposure with your Auto Exposure Lock function (AEL).
 Of course, you could set the ISO for one full value slower – use ISO 100 instead of 200, for instance after you have set the exposure. This will cause the camera to over-expose by one full ‘f’ stop, but it’s often fiddly and as I always use the slowest ISO I possibly can anyway, this is not an option open to me.
Top photograph
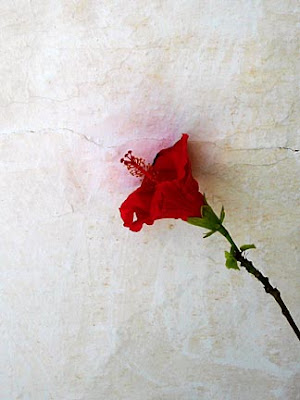
Even a very small dash of colour – like the red of this one flower – can have a dramatic effect when it’s placed against a ‘plain’ white wall. Keep your eyes open for these splashes of colour and position them carefully within your rectangle. In fact, look more closely and you will notice that that ‘plain’ white wall is anything but plain. It is full of colour and texture. This flower is placed more or less in the centre of the frame, but it’s often a good idea to revert to that good old Rule of Thirds when positioning your focal point.
Middle photograph
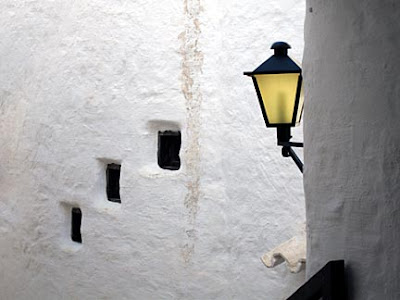
I’m pleased with the simplicity of this photograph. Again, there are no hard shadows, and that has softened the texture of the white walls. It helps to think in rectangles when looking for these compositions – just frame carefully and cut out as much unnecessary detail as you can
 Bottom photograph
Even the white paint-bucket and make-shift brush can make an interesting subject. Don’t be afraid to move in close and fill your frame. This will cut out distracting detail and add more impact
30 Jan 2008
Photographing white on white
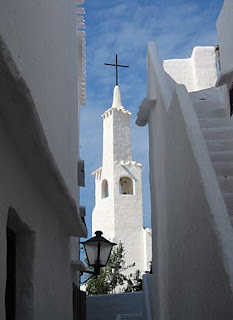 White walls, white steps, white roofs, white guttering – and even the white pot from which all that white paint comes – so where’s the photographic interest in that lot? Just all white isn’t it? Well, there’s a lot more to a white surface than you might think at first glance.
I’ve long been fascinated by the extraordinary array of textures, tones and hues to be found in plain old white. Photographing white surfaces and objects presents lots of difficulties, but all can be easily overcome with a little attention to basic technique.
The pictures here are the result of a one hour stroll though the narrow alleys of one small village in Menorca. Almost everything there is painted white.
To keep things simple, I set the White Balance (WB) to Auto White Balance (AWB), and this coped extremely well bearing in mind the tremendous range of colour temperatures between deep shade and bright sun..
The most difficult problem, when photographing white objects is exposure – but it is really a lot easier to solve than you might think. If you point your camera, with its built-in light metering system, at a white object it will register an awful lot of reflected light. In effect, your metering system is looking at all that white, saying ‘Gosh, there’s loads of light here, let’s cut down’. It is being fooled into cutting the exposure down. Unless you are aware of this – and do something about it – your picture will be under-exposed. All you have to do is set your Exposure Compensation function to around +1 – that’s plus one value, or one full ‘f’ stop. Then your camera will ‘over-expose’ by plus one ‘f’ stop to compensate for all that reflected light, and your image will be correctly exposed. Experiment until you get the exposure you want.
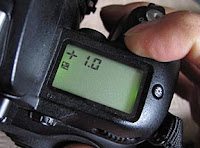
If you are using the Manual ‘M’ settings as I do all the time, there are another way of getting around this under-exposure difficulty when photographing white areas. I might frame my picture approximately and look at the exposure scale in the viewfinder. I then just set my exposure to over-expose by the appropriate amount – in other words, leave the pointer on the ‘plus’ side of centre. I do this either by setting one full ‘f’ stop over, or doubling the exposure time; for example, I’ll use 125sec instead of 250sec.
Top photograph
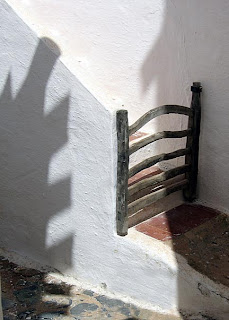
Bottom photograph
Next, in part 2 – more exposure options
29 Jan 2008
About photographers' rights
My thanks to Dennis for his comments about photographers' rights.
He has posted a useful link and I will re-post it here because I know he had trouble posting it himself.
http://www.usatoday.com/tech/columnist/andrewkantor/2006-08-11-photography-rights_x.htm
This should clarify the situation for photographers in USA - and give an interesting insight for those elsewhere.
Thanks again Dennis.
Canon G9 - shutter lag
 Thanks to Backlitcoyote (what a wonderful name) for the comment about the Canon G9. My initial disappointment with the camera centres around those two things – shutter lag and a lousy optical viewfinder.
That optical viewfinder is all but useless and I can’t imagine that it is beyond the resources of Canon to do a better job. Maybe if they concentrated more on how the camera actually handles in the real world – in a photographer’s hands – they would come up with something more useable.
When Backlitcoyote says it takes from 1/3 to ½ second from pressing the shutter button to the camera actually taking the photograph, is this, I wonder, even when the shutter button is already half-pressed to allow auto-focusing?
As I have said, I will put the camera to a proper test in real, practical situations as soon as I can. Meanwhile, I have to agree that the quality of the images taken on this Canon G9 is good. Maybe I just need to get used to it – but frankly, any camera that waits for half a second to take the picture just might get sent back for a refund or thrown at the wall. What possible use is a camera like this when photographing people?
I have posted my first couple of shots taken on this G9 – as you can see, nothing was moving and I used the LCD on the back of the camera to compose the pictures. The quality is fine. The photograph of the boat was done with very low side light in late afternoon, and this low light does tend to add a great deal to the crisp effect – the high resolution image is immaculate. The sky has burnt out on the left hand side, but, this can be expected with this type of shot where the foreground is so dark and the sky so bright. There are lots of ways around this, by the way, and I'll show you some in future posts.
28 Jan 2008
Photography weekend in Scotland
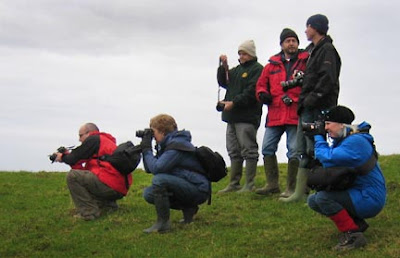
Hundreds of photographs were taken over the last couple of days, and an awful lot of them were done for the first time using the Manual (M) mode. I do like to help and encourage my students to understand and use the M mode, but I always stress that they should not be a slave to it – it’s the photograph that matters, not how the camera captured it.
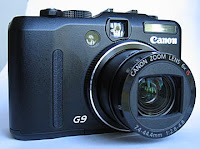 I get very little time to take photographs when I am coaching others, especially a group, so I didn’t get much chance to try out my new Canon G9. My first impressions are not very favourable – do I detect a considerable shutter lag? I’ll let you know more about this very soon when I have had chance to give the camera a thorough test when I am out taking photographs. Meanwhile if anyone has any experience of this little camera, please do post a comment and let me know what you think. I am already doubtful.
26 Jan 2008
Photographers' rights
There is a very interesting thread running on one of the photography forums right now about the legal rights of photographers, and how they affect you taking photographs in the street.
I have already made my thoughts very clear about the freedom of photographers to take photographs what they wish in a public place. However, there is a link on this thread that UK photographers might find very useful. It is to a downloadable pdf file setting out the legal position. It was written in 2004 and is due for an update so bear that in mind.
http://www.sirimo.co.uk/ukpr.php/2004/11/19/uk_photographers_rights_guide
That forum group is something very special to me. I did not start it and do not have any say in the running of it. It was started by a group of my former students and is going from strength to strength. There is a great deal of sharing of information.
I know that the moderator, Maria, would make you most welcome if you wanted to join and I’m convinced you will enjoy the fun company.
Go take a look…
http://tech.groups.yahoo.com/group/photoactive_photographers
I’m running one of my Photography Weekends here in Kirkcudbright this weekend so my time to post on the blog is pretty limited. I’m working with a great group of photographers and everyone seems to be enjoying themselves – keep you fingers cross for us tomorrow – we need some good light and weather.
25 Jan 2008
Photographing people - TEN TIPS
 Questions, questions
My students ask all these questions when I suggest we go out and take pictures of people in the street. Some have to make a great effort to pluck up enough courage just to take the camera of the bag. Usually it does not take them long to see how much fun it is and how good the rapport can be with total strangers.
Will people object to being photographed?
A
Well, I suppose you can make a friend or a foe in 1/500sec, but mostly people will either ignore you altogether, or ask why you are taking their picture. A perfectly reasonable question that deserves an answer. The amateur photographer has got the ideal reply – “I’m just a keen photographer who enjoys photographing people, I hope you don’t mind.”
Q
Will they become aggressive?
A
Very, very rarely. Common sense and basic street craft comes into play here and you will soon learn when to leave the camera in the bag. If someone tells you to ‘go away’, just smile and go, don’t argue, there are plenty of other subjects to choose from.
Q
Should you ask permission first?
A
I nearly always prefer to get something in the can and ask permission afterwards. Again, much depends on the circumstances, but remember, when someone says they don’t mind being photographed, you might have a ‘tame’ subject and you should ask to take more pictures.
Q
What should you do if they spot you taking their picture?
A
Take another picture – often the reaction to being photographed can create a very special photograph. Then smile broadly, hold both hands up and tell them what you are doing and why.
Q
TEN TIPS
Use fast shutter speeds to freeze people’s movements. 1/250sec minimum if possible. This may require a faster ISO such as 400 or 800 in poor light conditions.
Keep your camera set for instant use either with the correct exposure on Manual mode, or use TV (shutter priority mode). And keep your camera accessible – preferably around your neck and perhaps tucked into your jacket.
Be patient. Be observant and watch people closely.
Be aware of everything going on around you.
Anticipate where people are likely to go – you will learn to predict their movements quite well with practise.
Find good viewpoints and wait for people to move into them.
Start with ‘back view’ shots of people.
Take lots of pictures. That ‘decisive moment’ can be elusive.
Travel light – big, heavy camera bags are a nuisance and will attract attention.
Keep your camera bag zipped up when working in a crowded street. It would be a shame to lose equipment to light fingers while you are concentrating on taking pictures.
Top photograph
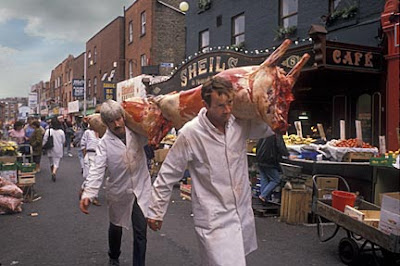
Once you have got more used to being seen about in the street with your cameras you can really start to enjoy yourself. You will find subjects everywhere. You must always be aware of what is going on around you all the time. Keep your eyes open and be prepared to move quickly into the best position when you see an interesting situation developing. Sometimes the subjects come right up to you. In this case, the two butchers were carrying their wares down a Dublin street. With the exposure already set and using a wide angle lens, all I had to do was wait until they filled the frame and press the button
Middle photograph
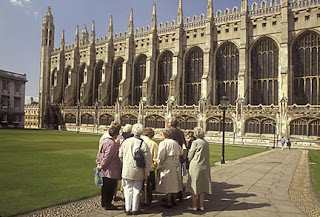
Towns like Cambridge are well used to people taking pictures, and chances are that you will be totally ignored when you raise the camera to your eye in a town like this. Don’t be in too much of a rush to take dramatic ‘candid’ shots of people straight away. Take it easy and slowly and concentrate on taking pictures of people who are absorbed in something else
Bottom photograph
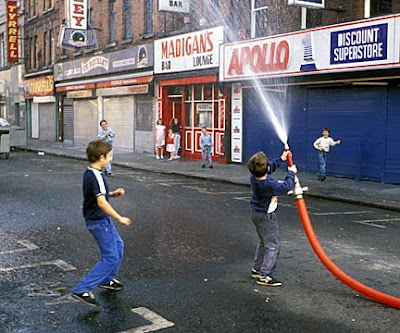
No photographer worth his salt is going to walk away from an opportunity like this. Just keep pressing the button. With lively subjects it is always best to take lots of pictures. There is no need to interfere with what is going on – the kids are having a ball. The most important thing was to avoid a soaking from the little beggars
24 Jan 2008
Photographing people in the street - part 1
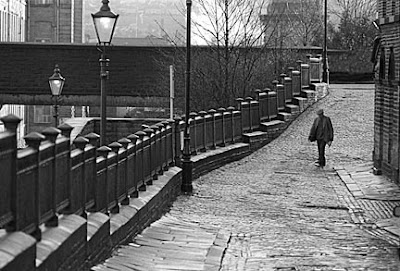 The most easily accessible location for photography is right outside your own front door – in the street if you happen to live in town. Out there people are coming and going about there daily lives, and the houses, buildings and surroundings themselves can make really worthwhile subjects. Yet so many photographers get into a sweat at the very thought of taking pictures in the street. Quite understandably, they feel self-conscious and a bit nervous about pointing their cameras at perfect strangers. This is normal, and if you feel that way, you are not alone. You probably also feel as if you are being intrusive. Well, in a way, you are and because this type of photography brings you into contact with total strangers it does not suit everyone. However, you don’t always have to tackle your subjects head-on - there are many more subtle ways of capturing pictures of people than simply sticking a camera in their face
The first and most important thing to remember is that you have a perfect right to take photographs in a public street. It is a right you should use.
It can help if you start by taking photographs of public street events or parades, where everyone participating and watching will expect lots of photographs to be taken and will readily accept the presence of photographers. A good training ground can be a busy tourist town – again, people will be expecting photographers to take pictures. You could try back views of people to begin with so that they may not even know they have been photographed and will not question you. All this will help you gain confidence.
Eventually someone will turn round and see you taking their photograph. Rule Number One – press the button again, smile broadly and say something pleasant. Tell them what a great picture they have helped to create, how good they looked and how you could not resist taking it. Laugh – be happy! Go forward and show them the picture on the preview screen if they are interested. Let’s face it, you would not have taken the person’s picture in the first place if you felt the subject looked at all threatening, so who knows, you may gain a friend, or a least a ‘tame’ subject who you may be able to ask to ‘do it again’. This approach can lead to countless happy encounters with strangers and many great pictures. Just don’t expect to be an expert overnight, it takes time to build technique and confidence – especially confidence.
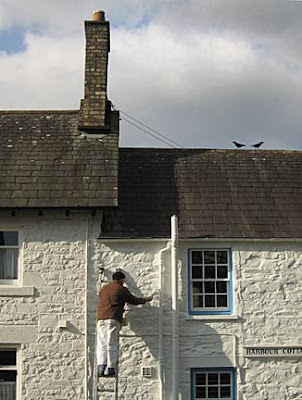
Man on ladder
Gain confidence by photographing people without them knowing – call these candid shots if you wish. If subjects have their backs to you, then you can shoot away to your heart’s content. This chap had no idea he was being photographed – nor could he see those jackdaws above his head on the roof. They really helped make the picture
Top photograph
You can progress from shots of people’s backs to full frontals quite easily. Use a medium telephoto lens – the equivalent of a 180mm is fine. Once again compose your picture carefully without people in it. Get everything set then simply wait until a likely subject strolls along and press the button. Minimum 1/250sec to stop the subject and reduce camera shake. You can assess your potential subjects well in advance and if you don’t like the look them just wait for another one
Bottom photograph
You need a clear view of a busy gateway or entrance for this exercise; somewhere people will have no choice but to walk through the gap. Find a good out-of-the-way spot overlooking the spot and get comfortable; a bench where
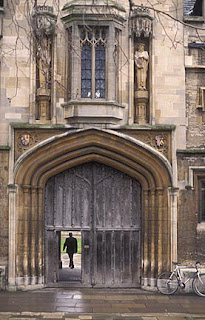 you can sit down is ideal, or stand in the shadow of an alleyway where you are unlikely to be noticed. Don’t rush. Take your time framing and composing your shot. Set the exposure. Now everything is ready and your trap is set. All you have to do is wait for the right person to walk into shot and press the button at the right moment – you have taken your first candid shot and the person you photographed knew nothing about it
Tomorrow I’ll give you a list of TIPS and answer some FAQs about street photography
23 Jan 2008
Photographing people - inhibitions
 Self-consciousness is probably the main reason for holding back the talents of so many photographers. The thought of taking out a camera in public and pointing it at another person fills most photographers with dread. Why?
Maybe I was lucky to have had every inhibition knocked out of me at a very early age when I was an apprentice on a local newspaper. Even at the age of 15 I was expected to stand in front of a crowd of people and organise them into a group photograph – all this while using a 5 x 4 glass plate press camera and a flash unit with wet cell batteries I could barely lift. The first time I did this ‘solo’ was at a Christmas Fair in a school hall. The highest vantage point was the stage, and beneath the stage was laid out a table full of cakes and goodies. My boss, the chief photographer, stood at the back of the hall watching my performance.
In a voice barely broken by puberty, I yelled for attention and got a group of people herded near to me so that I could look down on them from the stage. You must bare in mind that in those days, the mantra of a local newspaper was ‘faces sell papers’. In other words, the more people you get on the photograph, the more newspapers will sell. I had gathered together perhaps 40 faces.
The very edge of the stage had a lethal sloping edge. You guessed it – just as I got everything set I slipped down the edge and skidded onto the table below. I watched my boss cover his face in shame as I waded ankle-deep in cream cakes and blancmange. However, the results of this spectacular fete of ineptitude was that everyone laughed – and I got the happiest photograph ever used in the newspaper.
Since that day I realised that it doesn’t matter a tinker’s cuss what people think of you at the time – provided you get the picture that matters. In actual fact all the ladies in the group rushed to offer me their motherly care – once they had stopped laughing.
---
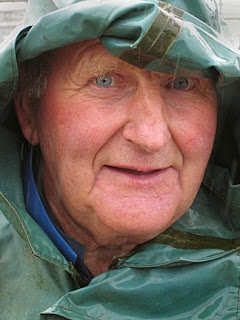
Viv asks do I think black and white works best for people photographs, or is it my newspaper background? Well, Viv, a bit of both really. I love black and white. It has a power that colour can never quite equal. I do happen to have a library of b/w negatives numbering around 150,000, so I have plenty to go at. But that doesn’t mean I don’t enjoy shooting colour. Just to prove it I have posted a couple of colour ‘people’ pictures.
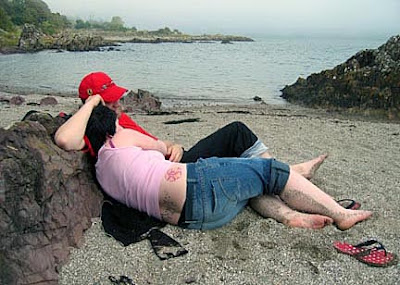
The shot of the couple lying on the beach was taken with their consent. I saw them from some distance and took the first picture with a short telephoto lens, but I wanted to get right in close with a wide angle. The camera was glued to my eye as a walked carefully forward and spoke to them – ‘You look absolutely wonderful, please don’t move and let me take a photograph’. I was actually taking photographs as I spoke. They were a lovely, happy couple and delighted with the result when I showed them the picture.
So throw aside those inhibitions and take more photographs.
I’ve posted the photograph of the farmer to show that I’m quite happy to shoot colour for street portraits.
22 Jan 2008
Photographing people in the street
The correct lens for photographing people in the street is the lens that enables you to get the picture you want, and a photographer who hog-ties himself to this sort of narrow-minded work practice will miss an awful lot of worthwhile photographs.
I do not have a favourite lens for my street photography. I am just as likely to use a 24mm wide angle or a 180mm telephoto – rarely anything longer purely because of the inconvenience of carrying large lenses about. Quite apart from its effect of isolating your subject with its limited depth of field – as in the photograph above - a small telephoto sometimes enables you to remain just that little bit less conspicuous. I am perfectly happy to move in very close with my wide angle when I feel the picture needs that sort of approach.
When GlenF commented that photographing people in less-developed countries is still a delight, I have to agree. I’m not sure I agree that people in Western countries are more suspicious, though – perhaps they are just less civilised. I’m sure someone will correct me if I’m wrong, but when Mahatma Ghandi was asked what he thought of Western civilisation, he answered, “I think it will be good when they get it”.
Thanks to Saw Lady for her comment about paying street performers when you want to photograph them. I’d love to come over to NY to photograph you at work, and I think your blog is great. I suspect you get an awful lot of snappers photographing you already.
www.sawlady.com/blog
21 Jan 2008
Travel photography
The result of my trip across the river was a set of photographs that still sell many years later and the joy of meeting people who rarely came in contact with tourists – despite the fact they were just a few hundred yards away across the River Jumna. The picture was taken for The Sunday Times
20 Jan 2008
Photographing people - do you pay?

Continuing my idea of showing you some of my pictures taken in India, here is one I took on a railway station platform.
I have quite deliberately included the figures sat on either side of the main subject. Without them the picture loses a great deal of its sense of place and context. I particularly like the large cosh the sleeping man has placed so conveniently to hand.
GlenF asks about street photography: "How about paying people on the street?" Well, the smart answer is - 'it all depends on the circimstances'. If your subject is a street performer or artist, then you must pay something. That's fair. So drop something into his hat or tin before you start taking photographs - and make sure the performer sees you do it. I very, very rarely pay - unless I really do want a picture of the person - and then I'm damned sure to get my money's worth.
I can not tell you how to blend into the background and yet still capture the things that happen around you. This is just something you must learn for yourself by actually doing it - or observe a professional as he works the streets. It's a lot about body language and the way you move around. It's about the way you look or don't look at people and the way you seek or avoid eye contact before and after you take your photographs. That's what my students learn from me on those holidays I run in Menorca when we cover Travel Photography.
http://www.photoactive.co.uk/menorca/menorca01.htm
19 Jan 2008
Photographing people - eye contact
 These two photographs are part series I took while working on assignment in India. They show the patients of a mental hospital. These people where lucky – they were very well cared for by a dedicated group of nuns and nurses.
Much of the power of the photographs comes from the fact that they depict vulnerable people in a sparse and austere setting. However a major contributor to their impact is the direct eye contact with the principal subjects.
Never underestimate the power of a portrait photograph when the subject is looking directly into the lens. The viewer makes immediate contact with the sitter and feels a shared communication. You may have noticed this in many of my photographs of people. It is not done by chance, but is a technique I like to use often whenever I feel it will add power to the photograph. In the photograph of the boy and the nurse, the viewer should be able to share the youngster’s joy at seeing a stranger (me) taking his photograph. However, it is essential that the nurse should be looking down at the boy and not at me. This conveys her concern and care for her patient. Had she AND the boy been looking at the camera, the photograph would be little more than a record of their faces.
The top photograph works because, again, the subject is looking straight at the camera – there is eye contact. This time, his inability to get up to look properly is emphasised by that the glance of the eye.
Perhaps I’ll publish some more photographs from this set tomorrow. I feel a yen to show you some of my pictures. Can you cope with that I wonder?
18 Jan 2008
How to use the direction of Light - part 3
 The considered application of light can transform a photograph from the mundane into something with much more visual power. This photograph of an old man is desperately simple – a straightforward head and shoulders – but the power of the photograph comes not only from the man’s interesting face and his direct look into the lens, but from the way his face is lit. In this case from one side - sidelight.
A profound understanding of light is one of the photographer’s greatest assets.
MOVE AROUND – CHANGE THE ANGLE OF THE LIGHT
These three photographs are of the same subject and were taken about the same time on the same day, but look how different the it appears just by walking around it and photographing it with the light from different directions. 


Front light has been used in A to show all that wonderful red colour – care was needed to avoid the flare coming straight back at me from that glass in the cabin.
The sidelight B has shown the hull of the boat to have form and shape. It’s also given texture to the tussocky grass in the foreground.
The backlight in this picture C has reduced the boat and the objects on it to a series of silhouettes. There’s no colour shown in the subject at all – just outline shapes.
TIP
HIDE YOUR SHADOW
 When moving in quite close with the light directly behind you – using frontlight to accentuate the colours of your subject – you are likely to get your own shadow – just like in photo D. Try moving back a couple of paces and zooming in to cut out this unsightly shadow – unless of course it is part of your idea to leave it in. See photo E. You will alter the perspective of you picture a little, but it may be worthwhile.
17 Jan 2008
How to use the direction of Light - part 2
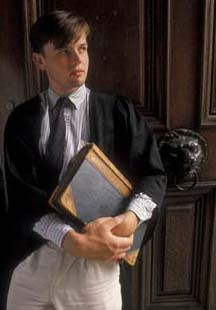 You must be able to recognise the particular attributes, advantages and disadvantages of any light source instantly. This will let you to get exactly what you want from every subject.
We’ve already looked at sidelight, but just to re-enforce how useful it is take a look at the superb sidelight used in the photograph of the young student. The picture was taken in an open doorway – a very useful location for finding sidelight – especially when the sun is high in the sky - see today’s TIP.
Roughly, the direction of light can be divided into side, front, back and toplight.
Bear in mind that in the real world the direction of light might be a combination of some of these headings…. ‘toppy-back’ light, for instance - there’s a new word for you. Sometimes the light may be totally non-directional. You won’t always be able to change the direction of the light – but often you will be able to adjust your shooting angle or the position of your subject in order to make the most of what you have. For instance, you may be able to time your visit to a certain location to coincide with the direction of light that will show it off best. Sadly, this is not always possible especially for professional photographers under pressure of time and deadlines. They will have to resort to all sorts of tricks – but I’ll tell you more about those in future articles.
TOPLIGHT
This is the one to avoid whenever possible. Professional travel and landscape photographers work both ends of the day – morning and evening. That’s because the light source, the sun, is low in the sky and can be used as front, side or backlight. With the light directly above, portraits look horrible. Landscapes and buildings look boring and no matter in which direction you look at it, the light remains the same.
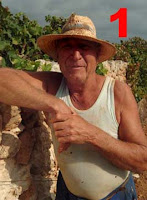 Photo 1 Ugh! Toplight. This is the one to avoid whenever you can. It’s midday and the sun is high overhead – definitely not a time to take portraits like this – especially if your subject is wearing a big hat. Avoid it. Come back later or ask your subject to step into a doorway where you can use sidelight – anything to avoid toplight
BACKLIGHT
Shoot into the light and put the light source behind your subject and, in the most extreme case, you will create a silhouette - emphasizing outline shape. Backlight does not have to be quite so obvious, though, and with a little diffusion from such things as clouds or reflectors, it can create a soft, subtle ‘atmosphere’. I’ve already touched on this when I wrote about the ‘quality’ of light. Backlight often creates a rim, or halo effect around the subject – this is much-used in studio portraiture to separate the outline of the model from the background. If you intend to emphasize the outline shape of your subject, use backlight.
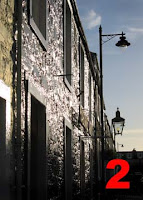 Photo 2
Using backlight to photograph this street, most of the colour has gone, and the picture looks monochrome. The powerful backlight has shown the outline shape of the street lamps – and notice the effect of using backlight on the shiny, uneven surface of that dark wall. It really has created a dramatic effect. Remember, backlight over a dimpled, shiny surface – like wet mud, ripples on water, wet cobbles or even wet grass, can create spectacular result
FRONT LIGHT
Put the light source directly behind the camera - front-on to your subject - and you take away the shadows. This tends to ‘flatten’ the image; it loses any 3D effect. However, front light has a great trick up its sleeve… shadows often obscure colours. So if you want to see more colour – use front light. The downside is that you lose texture and form in your subject.
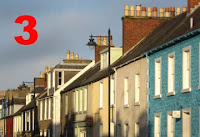 Photo 3
With the light almost directly behind the camera and front-on to the subject, I have tried to accentuate the bright colours of these houses by taking most of the shadows away. But at a cost – look how flat and two-dimensional the chimney pots look. The shadows you can see in the bottom of the picture are cast by a row of houses behind me
TIP
Positioning your subject just inside a doorway, out of the direct sun, is almost guaranteed to offer you good sidelight. This is one of the simplest ways to avoid toplight and create beautifully lit natural portraits when the sun is high in the sky at midday. That’s the time to start looking indoors in search of better, more useable light.
15 Jan 2008
Question about manual exposure
Another former student of mine, John Hamshaw, emailed me with the following question about my article on using Manual Mode exposure settings...
May I ask a question about your M is magic blog article no 1? You give the example of the two basket pics, where you say that you manually set the aperture to 5.6 and manually set the speed to 1/30th sec. This gives a reading on the exposure scale that the pic will be underexposed (obviously by the camera's built in meter), and you therefore correct it manually to 1/8th sec to set the scale reading to '0'. Isn't this the same as setting the camera to Aperture priority, set at 5.6, and when half pressing the shutter release, the same camera reading/meter will set the camera automatically to 1/8th sec?
(No doubt you will think this is a dumb question and what on earth has JH learnt from me in two courses??...but if it isn't and you want to use this question on the blog please do so)
Best wishes, John
Thanks John,
No, those courses were not wasted - I know what beautiful photographs you take.
The only dumb question is the one that is never asked.
Yes, in effect, what you say is correct. BUT... when you are using an automatic exposure mode such as Aperture Priority, unless you use the Auto Exposure Lock (AEL) function, every time you make an adjustment to the your framing of your composition the chances are that the exposure will change as the metrering system reads from a different area of the subject.
This is precisely why I cannot be bothered with auto settings.
I want to take my reading from the area of the subject I choose and for that exposure not to change when I re-frame the picture. Yes, I can do that by locking the exposure - but that seems to defeat the object for me.
Wedding photography
I have said before that I am not designed for wedding photography - and I do say that to my students that when they ask me give them some instruction on the subject. However, the basics of good photography are the same no matter what you are photographing.
Craig Dempster came to me before taking on a wedding - quite a responsibility. He had done a couple of weddings before for friends, but this was a big assignment and he was very aware of his responsibilites.
He had a new DLSR and was getting just a bit lost. I'm delighted to say that I was able to put him of the right track and he has sent me a link to a short slide show which I'd like to share with you. I am really very impressed. I don't much care for the strong, hard toplighting of a few of the shots of the bride and groom, but otherwise I think he has done a really good job, imaginative and lively - and the bride and groom were over the moon with the results.
This is what Craig wrote to me...
Hi Philip
I was generally quite pleased with the [wedding] day. Still some issues with sharpness but the training you gave me on the group shots really paid off. I put the camera on a tripod and managed to get well balanced, sharp shots with very slow shutter speeds with the flash and soak up some of the background. I was so glad I came down to you for a day! I spent the most part of the wedding day walking around with the monopod!
I was also quite pleased with some of the first dance shot were I put the speedlight on a speaker and fired it remotely which created a nice silhouette effect in Kerry's vail.
Anyway thanks again. Your help and advice was invaluable.
You can see the show http://www.imagehindsight.co.uk/kerry&howard (excuse the music but they asked for it - Their first dance!)
Best regards
Craig
14 Jan 2008
How to use the direction of Light
Oddly, you don’t need a camera in your hands to practise ‘seeing the light’. Start by observing the way it falls on everything around you; people’s faces, buildings, trees, water. You can do this any time, anywhere, no matter what you are doing; walking to work, sitting by a window, out shopping. This is part of a process that will enable you to be objective about your photography and to start seeing the way the camera sees.
Only by understanding and seeing the way the camera sees will you be able to express your visual ideas with certainty.
Observing light soon becomes a habit – a way of seeing - and you won’t be able to stop seeing it once you start – I tell my students it’s like the Chinese curse of having a monkey on your back – you can never get rid of the habit once you’ve got it. However, our Light Monkey is a helpful soul and he is always there to help… although he may give you a sharp poke in the ear if you stop listening to him.
Good, and appropriate, light can enhance you photographs in so may ways. Just one of those ways is to accentuate the illusion of depth within your two-dimensional image. Think of yourself as an illusionist – one of the most powerful illusions you can create is that illusion of depth – the third dimension. Composition is one way to achieve this, the other is intelligent use of light direction and quality.
I’m going to be looking at the different directions of light and how they can transform and enhance your photographs. First, let’s talk about side light – it’s perhaps the star of the show.
SIDELIGHT
With the light to one side of your subject (almost any subject), you will create the illusion of depth, texture, shape, form, substance, on your two-dimensional photograph. This can be powerful stuff. Side light can transform everything from portraits or landscape into strongly textured images with the illusion of that third dimension. Beware, though, with portraiture it shows every imperfection of a model’s complexion, some subjects hate it as it shows the texture of their skin (wrinkles), so it’s not the way to disguise those ‘laughter lines’. In townscapes it can make buildings appear as 3D cubes. In landscapes, sidelight makes tree trunks look round, and brings out the contours and textures of hillsides and fields – and all because the light is on one side and shadows are on the other.
Photography weekend
Just to let everyone know, the Photography Weekend ' Making Pictures Happen on 25th-28th January here in SW Scotland is now FULLY BOOKED. I'm sorry if you have been disappointed and unable to get a place.
At the moment there are still places available for 7th -9th March at The Cally Palace Hotel - the theme will be portraiture, both with and without flash.
Full details at www.photoactive.co.uk/kbt_groups/kbt_groups_cally.htm
There are also still places available on the Photography Holiday in Menorca 2nd-9th May 2008. The theme will be travel photography.
Full details www.photoactive.co.uk/menorca/menorca01.htm
These weekends and holidays are designed to be instructive and great fun. Come and join us.
13 Jan 2008
How to use Manual Mode - part 2
For those who have not used their camera on ‘M’ before, let’s take away some of the confusion and myth by saying that you do not need to juggle BOTH the shutter speed settings AND the aperture settings straight away and at the same time. You simply start with one or the other, set it – then look at the exposure scale (see pictures in last post) and move the other setting until the pointer is in the centre of the scale.
So how do you know whether to set the aperture or the shutter speed first?
Well, there are many subtleties, but basically it is very simple - let’s say you know that your subject is moving quickly so you need to set a fast shutter speed. Do it – set maybe 1/250sec. You can do that even before the camera comes up to your eye. Now, look through the viewfinder at your subject and change the aperture setting until the pointer on the exposure scale is in the centre.
If you know you need a small aperture in order to get the maximum depth of field for a landscape shot, for instance, set the aperture first – say f16. Then look at the exposure scale through the viewfinder and change the shutter speed (slow it down or speed it up) until the pointer is in the centre of the exposure scale.
Of course, as a rough guide, the smaller the aperture (higher the f number) the slower the shutter speed will have to be. The faster the shutter speed, the wider (lower f number) the aperture must be.
All this needs practice – but so does anything worth doing. Eventually you will get to the stage where you can take pride in the fact that your camera craft has become intuitive. You will make mistakes – don’t worry. We all do.
Never let setting the exposure get in the way of capturing the moment. You will be surprised how quickly you will be able to set your exposures manually. Do bear in mind that once your exposure has been set roughly for the light in a particular situation, chances are that only minor adjustment, if any, will be necessary for each different picture. If you think you are going to miss a picture – revert to Auto Exposure mode. It’s the picture that matters, not the way it’s exposed.
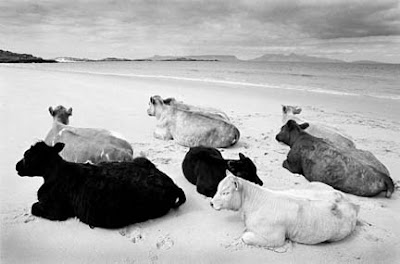
For photograph of the cows on the beach, I set a small aperture first – f16. That was because I needed all the depth of field I could get. The shutter speed was then set to match that aperture. The photograph is not just about cows, it is about cows out of context in an unusual setting. That setting had to be sharp and clear – hence lots of depth of field.
12 Jan 2008
How to use Manual Mode - part 1

P - Programme
TV - Time Value, sometimes known as Shutter Priority (S)
AV - Aperture Value, sometimes know as Aperture Priority (AP) or even just ‘A’
M - Manual
I rarely use anything but the ‘M’ mode, so here are the basics – or at least, the way I use it. If I had a dollar for every photographer who has asked me to explain in simple terms how to use ‘M’, I’d be a rich man.
In all modes except 'M' , the camera goes all, or some way, to deciding what it thinks is the ‘best’ exposure. I refrain from saying the ‘correct’ exposure, because like all automatic processes, it doesn’t always do what you want it to in the real world.
That’s why I almost always use the ‘M’ setting. I like to decide on the exposure I want.
The first thing to remember is that when your camera is on the ‘M’ setting it does not mean that you are left entirely to your own devices to arrive at a correct exposure either by guess work or by using a separate, hand-held exposure meter – you certainly do not need one of those. Your camera has a very efficient and perfectly useable exposure meter already built into it.
If you have always used your camera on automatic settings, you might not have noticed that when you switch to the ‘M’ exposure mode, a scale appears somewhere at the side or bottom of the viewfinder. On some cameras this scale appears on the LCD as well. All cameras vary, but most scales will have a plus sign ‘+’ at one end and minus ‘-‘ at the other. Beneath or beside this scale might be a moving pointer, or the graduations themselves may light up. Whichever it is, when the pointer is in the centre of the scale, you have a correct exposure. The graduations are often in 1/2 or 1/3 values, or f stops, so if you have the pointer on either the plus or minus sides of the centre, you will be over or under exposing by the indicated amount. Easy.
In ‘M’ mode, the exposure is adjusted by altering either the aperture and/or the shutter speed settings. As you do this, the pointer on the scale moves. To keep things easy, set your metering to ‘Centre Weighted’ mode. ‘Averaging’ mode is too… well, average, and ‘Spot’ mode is too precise and sensitive until you get used to things. I use ‘Centre Weighted’ almost all the time. In ‘Centre Weighted’ mode, most cameras will take an average light reading of the whole scene, but will take much more notice of the central area, and this can be very useful.
Once you master the basic of the Manual mode, you will quickly realise that you can have total contril ver your exposure. Yes, you will make some mistakes, but that is all part of the learning process. You will find that the rewards from ‘doing it yourself’ and being in control will really enhance your enjoyment from your photography. ‘M’ doesn’t just stand for Manual – it stands for MAGIC!
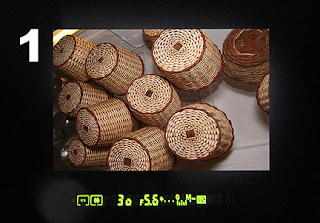 1
1You will see something similar to this in your viewfinder when you are in ‘M’ (Manual) exposure mode. The exposure scale has ‘+’ at one end and ‘-‘ at the other. Here, 1/30sec at f5.6 has given a reading on the ‘minus’ side of the scale – the picture will be under exposed.
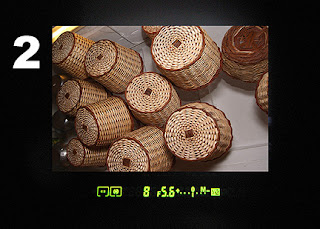
2
By slowing down the shutter speed to 1/8sec, the reading is now in the centre of the scale at ‘0’. This is the correct exposure for this subject.
 Next, in Part 2, I’ll explain more about the Manual mode and how to use it.
11 Jan 2008
How to take flash photographs – part 4
For the photojournalist, a small portable flash is absolutely essential. Without it, he, or she, could not hope to get professional standard photographs in difficult, remote and often poorly lit locations. I have often chosen deliberately to photograph my subjects in what might be described as ‘difficult’ light conditions, and the reason for this is simple – those difficult light conditions can produce highly atmospheric photographs.
Take a glance at the photograph of the man sitting astride the old butcher’s bicycle. This was a wonderful story about a man called Cor Ellen – he is a professional beachcomber on the Dutch Friesian island of Texel in the North Sea. I was commissioned to photograph him for an article for ‘You’, the Mail on Sunday Magazine in UK. I took a great many photographs of Cor – in his home, working on the beach, with his collection of extraordinary things found washed up on the shore. But I wanted an atmospheric shot of Cor on the old bicycle he used to get around the island. I also wanted to show the atmosphere of this remote, wild and windswept place – where better than on the shore beneath the lighthouse.
To add atmosphere, I chose to wait until late afternoon when the light was fading. The camera was put on a tripod. I took a light reading of the cloudy part of the sky. At ISO100, that gave me 1/15sec at f11. The flash was held in my hand as far away from the camera as possible to my right hand side. It was connected to the camera by a long cable (synch lead). I timed the flashes of the lighthouse and pressed the shutter just before it shone.
The flash has fired and lit Cor and the bicycle, but the shutter has remained open – gathering the light from the sky and the lighthouse. A very similar technique to that I described in my article about photographing sparks.
TIP FOR TODAY
Try to avoid those ‘curly’ flash cables – the springy ones like those on a telephone handset. They are a menace because the temptation is to stretch them just a little more, and a little more, to get the flash just that little bit further away from the camera. Then BANG! the tripod is pulled over. It happens so suddenly you will be unable to stop it. Better – if you can - to use a long, simple synch lead with no spring or curls in it. Then you will always know how far it can be pulled.
Cordless infra-red devices are often unreliable in adverse outdoor conditions.
10 Jan 2008
Comments and links
Visitors to this blog are increasing daily - and that is really good to see. You are welcome... and so are your comments and emails, so please keep them coming. If you have any questions about any of the posts, please ask through the blog comments so that I can share the answers with everyone.
The search engines have just started to take notice, so it is time I started building reciprocal links to other, appropriate sites. If you would like to share links, please let me know. I am happy to share - if you do the same for me. I will check out all sites before placing links.
Keep snappin'
How to take flash photographs - part 3
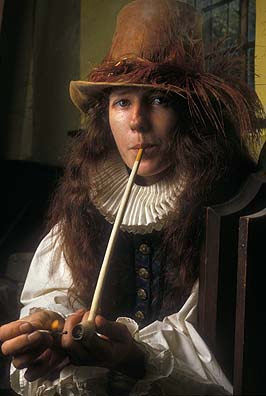 When I said that sidelight was the ‘star of the show’ I meant it. It is not always ideal for making attractive women look more glamorous, but when you want to bring out the character in your subject, it can work extremely well. For portraits, it is really very easy to create with a flash attached to the hot shoe of your camera. The soft sidelight in the picture of the girl in period costume was done simply by pointing the flash at a large reflector positioned out of shot on the left. I have used a fairly fast shutter speed 1/160sec to cut out most of the ambient light in the background, which has gone quite dark - just the effect I was looking for. What could be easier?
Remember, flash is an instant burst of light. If you are shooting in a room that is also brightly lit by daylight coming in through the windows or strong artificial light, and the shutter remains open after the flash has fired (slow shutter speed), you will ‘gather’ more light in the camera. This can be a very effective technique for certain subjects. It can ruin others.
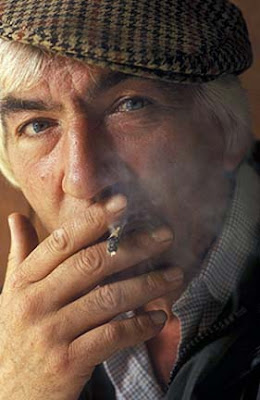
Now take another look at the portrait posted in part 2 of the chap kippering his lungs with the roll-up cigarette. This time I have bounced the flash off a light-coloured wall off to the left and used a slow shutter speed, 1/15sec. This has ADDED some ambient light which has helped fill the shadows on the right side of his face. The slight blurring of the smoke is evidence of that slow shutter speed. The flash has gone off and lit his face on the left of the picture, but the shutter has remained open long enough to gather some available light on the right. A very different effect from that picture of the girl in costume, but it has worked in this situation.
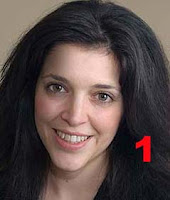 1
1I have bounced the flash off a light-coloured surface to my right. This creates good sidelight which has lit the model’s hair nicely and given shape and form to her face. The nearer the flash is to the reflective wall, the stronger the shadows will be. The effect was done by using the set-up in 2
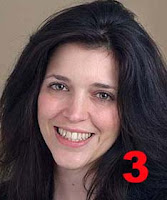
3
If you want to soften those shadows, simply put another reflector opposite the flash. This lovely, soft, flattering light is created by pointing a flash at a wall to the right of the model while placing another white reflector to the left. This reflector helps fill any shadows created by the sidelight
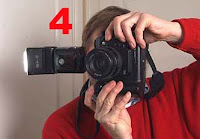
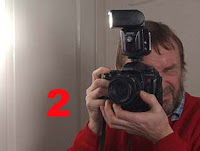 4
4Some flash guns do not articulate to the sides – they will only point dead ahead and upwards. Don’t forget you can reflect these flash guns off a wall to create sidelight if you turn the camera on its side and shoot in portrait format. The most versatile flash guns have a light head that can be swivelled both upwards 90 degrees, and also to either side and directly backwards – away from the subject. Almost any angle of light reflection can be achieved with this type of flash gun.
Flash is the most portable, convenient and versatile light source you can use, but a moveable flash head that can be aimed in all directions is essential if you are to achieve the most from a flash unit when it is attached to your camera
9 Jan 2008
How to take flash photographs - part 2
 Let’s go though just a few of the techniques you can use to capture simple indoor flash portraits when your flash unit is attached to your camera’s hot shoe.
The essential thing to remember is that a portable flash is a very small-sized light source and when pointed directly at your subject will cause hard-edged, dark shadows.
Flash is an instant burst of light lasting sometimes as little as 1/20,000sec, so its effects are difficult to predict. Lots of practice helps, but remember, you have the luxury of instant digital playback – so use it; and don’t be afraid to experiment if you don’t get it right first time.
What about ‘bounced’ flash? Bouncing (reflecting) light off a white wall or reflector is a bit like playing snooker – its all about judging angles and distances. It really does need practice. Do not get fixated by bouncing (reflecting) the flash off the ceiling. That will give you toplight. Ugh! We spend a lot of time avoiding top light when we are shooting outside by trying to time our photography for early morning and late afternoon when the sun is low in the sky. So why do we want to use top light indoors? It’s horrible. Just take a look at the set-up in picture 1. The flash has been directed up at a white ceiling. Its effect is seen in picture 2 – eyes light black holes in the snow, deep shadow under the chin. Don’t do it. You can improve things by placing a reflector under the model’s face (picture 4) so that some of the light coming down from the ceiling is reflected back up again under the eyes and chin. This has produced picture 3 – much improved.
Another possibility is to direct the flash back over your head to a large reflector positioned behind you. See picture 5. A wall, white door, or large white card will do. This should produce an effect similar to picture 6. Now,  in effect, you are using frontlight from a large light source (that big reflector behind you). It will have the effect of flattening the image by taking away the shadows. This can be very flattering for an attractive young model, but a bit boring when you are wanting to convey the character of an older or male subject. For that you need the ‘star of the show’ -sidelight - and I’ll show you more about that in the next post, but first, read about that picture I showed you yesterday...
So what was the set-up for the picture of the man with the mask?
A sheet of newspaper has been taped to the wall off the picture to the right and the flash head has been pointed at it so that the flash light bounces back to the  model’s face. The wall was about 5 feet away from us. The fastest shutter speed compatible with the camera’s flash synchronisation (1/160sec) has been used to eliminate any other light in the room and the model has been positioned as far as possible from the wall behind him. The light of the flash has not carried as far as this background so it has not been lit – it appears as a black. I wanted the deep shadows to add drama, so no reflector was used on the left hand side of the picture
 NEXT - in part 3
What was the set-up for the picture of the chap kippering his lungs with the roll-up fag, above?
And more on sidelight


