Showing posts with label exposure compensation. Show all posts

26 Apr 2008

Photography on the beach - part 2

A greater problem than the possibility of camera shake will be the task of getting the correct exposure. This is sometimes quite tricky with all that glare from white sand and sea. This will almost certainly confuse your auto exposure settings and will give a false reading on the manual exposure scale. So be prepared to use your Exposure Compensation setting to over-expose by around one stop if necessary. If you are using Manual exposure mode, simply set the exposure on the + plus on the scale by a similar amount. But check on your LCD and with your histogram function to make sure you have the exposure just right. You may have to go into your menu settings to brighten the LCD screen a little so that it will be more easily seen in the bright daylight.

Chances are you will also be shooting in very hard, contrasty sunlight, but the reflections from the sand might help fill the worst of the dark, empty shadows. The old rule about shooting early in the morning and late in the afternoon for the best light is generally a good one, but sunbathers are often out there baking themselves around midday when the sun is blazing down from an empty blue sky – you’ll just have to make the most of it.

Beware the sand and sea – a terribly destructive combination for camera gear. Keep lens changes to a minimum and never change lenses in sea spray or when the wind is whipping up the sand. This is just asking for trouble. Keep cameras out of direct sunlight whenever possible – body and lenses can heat up dramatically and this can do irreparable damage.
Top photograph
This was a posed photograph taken in Normandy. The composition was kept deliberately simple by choosing an angle facing straight on to the beach hut. The girl was asked to sit down right in the middle of the doorway and look to one side. I liked the shapes and combination of colours

Middle photograph
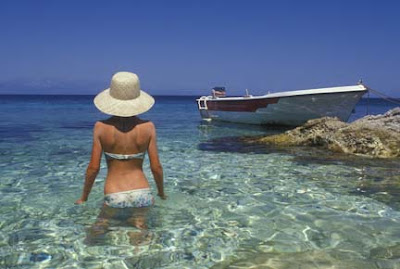
A polarising filter is a great tool when photographing in the strong summer sunlight. Here it has darkened an already deep blue sky and helped to take the reflective white sheen off the surface of the sea, exposing even more colour beneath the surface.

If the sun goes in – take the polarising filter off and maybe replace it with a Neutral Density (ND) Gradual grey filter to darken a cloudy sky, add atmosphere and draw the viewer’s eye down to the main subject.


Bottom photograph
The gift shops along the prom or on the pier are sure to attract lots of people looking for postcards to send home. All you need do is lie in wait for a likely subject and go to work. Chances are they will be so absorbed in what they are doing they won’t even notice you

31 Jan 2008

Photographing white on white - part 2


With the camera set to Manual (M) exposure mode, your other option is to use the camera’s build-in light meter to take a light reading from an area that is not just all white. I can’t be faffed with grey cards - there is nearly always something roughly mid-tone to point the camera at; a door, or perhaps your brown camera bag - I’ll take my reading from that. Once the shutter speed and aperture has been set to this reading, I then I point the camera back at the subject and take the photograph.

I have mentioned this before, but I’ll say it again – it is vital to ignore the light reading needle, or indicator, in the viewfinder when pointing the camera away from the area on which you have just set your light reading, and back at your white subject. Chances are that when you re-compose you picture on the white subject, the exposure meter pointer will now indicate over-exposure. Ignore it!

The biggest mistake my students make when doing this is to ‘chase the needle’ that is, they re-adjust the exposure when they point the camera back at their chosen subject and notice that the light reading says the subject is now over-exposed… that over-exposure is precisely what you do want. If you want to use this method with an auto exposure mode, you must lock the exposure with your Auto Exposure Lock function (AEL).

Of course, you could set the ISO for one full value slower – use ISO 100 instead of 200, for instance after you have set the exposure. This will cause the camera to over-expose by one full ‘f’ stop, but it’s often fiddly and as I always use the slowest ISO I possibly can anyway, this is not an option open to me.

Top photograph
Even a very small dash of colour – like the red of this one flower – can have a dramatic effect when it’s placed against a ‘plain’ white wall. Keep your eyes open for these splashes of colour and position them carefully within your rectangle. In fact, look more closely and you will notice that that ‘plain’ white wall is anything but plain. It is full of colour and texture. This flower is placed more or less in the centre of the frame, but it’s often a good idea to revert to that good old Rule of Thirds when positioning your focal point.

Middle photograph
I’m pleased with the simplicity of this photograph. Again, there are no hard shadows, and that has softened the texture of the white walls. It helps to think in rectangles when looking for these compositions – just frame carefully and cut out as much unnecessary detail as you can

Bottom photograph
Even the white paint-bucket and make-shift brush can make an interesting subject. Don’t be afraid to move in close and fill your frame. This will cut out distracting detail and add more impact

30 Jan 2008

Photographing white on white

White walls, white steps, white roofs, white guttering – and even the white pot from which all that white paint comes – so where’s the photographic interest in that lot? Just all white isn’t it? Well, there’s a lot more to a white surface than you might think at first glance.

I’ve long been fascinated by the extraordinary array of textures, tones and hues to be found in plain old white. Photographing white surfaces and objects presents lots of difficulties, but all can be easily overcome with a little attention to basic technique.

The pictures here are the result of a one hour stroll though the narrow alleys of one small village in Menorca. Almost everything there is painted white.

To keep things simple, I set the White Balance (WB) to Auto White Balance (AWB), and this coped extremely well bearing in mind the tremendous range of colour temperatures between deep shade and bright sun..

The most difficult problem, when photographing white objects is exposure – but it is really a lot easier to solve than you might think. If you point your camera, with its built-in light metering system, at a white object it will register an awful lot of reflected light. In effect, your metering system is looking at all that white, saying ‘Gosh, there’s loads of light here, let’s cut down’. It is being fooled into cutting the exposure down. Unless you are aware of this – and do something about it – your picture will be under-exposed. All you have to do is set your Exposure Compensation function to around +1 – that’s plus one value, or one full ‘f’ stop. Then your camera will ‘over-expose’ by plus one ‘f’ stop to compensate for all that reflected light, and your image will be correctly exposed. Experiment until you get the exposure you want.


Setting the Exposure Compensation value to over-expose by about one full ‘f’ stop is one of the simplest ways of getting the right exposure when photographing white. Don’t be afraid to experiment, you might sometimes need to compensate even more if the white is particularly bright

If you are using the Manual ‘M’ settings as I do all the time, there are another way of getting around this under-exposure difficulty when photographing white areas. I might frame my picture approximately and look at the exposure scale in the viewfinder. I then just set my exposure to over-expose by the appropriate amount – in other words, leave the pointer on the ‘plus’ side of centre. I do this either by setting one full ‘f’ stop over, or doubling the exposure time; for example, I’ll use 125sec instead of 250sec.

Top photograph
Looking out from a shaded alleyway at the brightly lit church tower caused fewer exposure problems than you might think. I just framed the picture and set the exposure using the centre-weighted mode. This has taken the reading from the very bright white tower, but also taken into consideration the large areas of shaded white. Notice how the light is slanting across the right hand surface of the church tower has created texture, while the light hitting the left side is straight on, and this has shown a flat, pure white surface

Bottom photograph


All the time I am looking for patterns and shapes created by shadows. These can be used as compositional devices in the same way that any other subject can. So place these shadows carefully and move around to adjust the composition. Shadows can create really interesting designs on white

Next, in part 2 – more exposure options