
With the camera set to Manual (M) exposure mode, your other option is to use the camera’s build-in light meter to take a light reading from an area that is not just all white. I can’t be faffed with grey cards - there is nearly always something roughly mid-tone to point the camera at; a door, or perhaps your brown camera bag - I’ll take my reading from that. Once the shutter speed and aperture has been set to this reading, I then I point the camera back at the subject and take the photograph.
I have mentioned this before, but I’ll say it again – it is vital to ignore the light reading needle, or indicator, in the viewfinder when pointing the camera away from the area on which you have just set your light reading, and back at your white subject. Chances are that when you re-compose you picture on the white subject, the exposure meter pointer will now indicate over-exposure. Ignore it!
The biggest mistake my students make when doing this is to ‘chase the needle’ that is, they re-adjust the exposure when they point the camera back at their chosen subject and notice that the light reading says the subject is now over-exposed… that over-exposure is precisely what you do want. If you want to use this method with an auto exposure mode, you must lock the exposure with your Auto Exposure Lock function (AEL).
 Of course, you could set the ISO for one full value slower – use ISO 100 instead of 200, for instance after you have set the exposure. This will cause the camera to over-expose by one full ‘f’ stop, but it’s often fiddly and as I always use the slowest ISO I possibly can anyway, this is not an option open to me.
Top photograph
Even a very small dash of colour – like the red of this one flower – can have a dramatic effect when it’s placed against a ‘plain’ white wall. Keep your eyes open for these splashes of colour and position them carefully within your rectangle. In fact, look more closely and you will notice that that ‘plain’ white wall is anything but plain. It is full of colour and texture. This flower is placed more or less in the centre of the frame, but it’s often a good idea to revert to that good old Rule of Thirds when positioning your focal point.
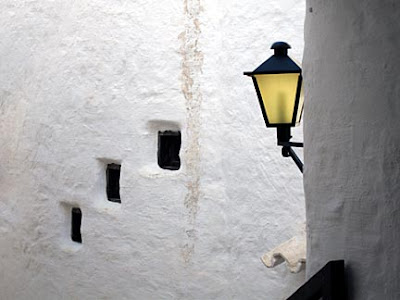
Middle photograph
I’m pleased with the simplicity of this photograph. Again, there are no hard shadows, and that has softened the texture of the white walls. It helps to think in rectangles when looking for these compositions – just frame carefully and cut out as much unnecessary detail as you can
 Bottom photograph
Even the white paint-bucket and make-shift brush can make an interesting subject. Don’t be afraid to move in close and fill your frame. This will cut out distracting detail and add more impact
I have mentioned this before, but I’ll say it again – it is vital to ignore the light reading needle, or indicator, in the viewfinder when pointing the camera away from the area on which you have just set your light reading, and back at your white subject. Chances are that when you re-compose you picture on the white subject, the exposure meter pointer will now indicate over-exposure. Ignore it!
The biggest mistake my students make when doing this is to ‘chase the needle’ that is, they re-adjust the exposure when they point the camera back at their chosen subject and notice that the light reading says the subject is now over-exposed… that over-exposure is precisely what you do want. If you want to use this method with an auto exposure mode, you must lock the exposure with your Auto Exposure Lock function (AEL).
 Of course, you could set the ISO for one full value slower – use ISO 100 instead of 200, for instance after you have set the exposure. This will cause the camera to over-expose by one full ‘f’ stop, but it’s often fiddly and as I always use the slowest ISO I possibly can anyway, this is not an option open to me.
Top photograph
Even a very small dash of colour – like the red of this one flower – can have a dramatic effect when it’s placed against a ‘plain’ white wall. Keep your eyes open for these splashes of colour and position them carefully within your rectangle. In fact, look more closely and you will notice that that ‘plain’ white wall is anything but plain. It is full of colour and texture. This flower is placed more or less in the centre of the frame, but it’s often a good idea to revert to that good old Rule of Thirds when positioning your focal point.
Middle photograph
I’m pleased with the simplicity of this photograph. Again, there are no hard shadows, and that has softened the texture of the white walls. It helps to think in rectangles when looking for these compositions – just frame carefully and cut out as much unnecessary detail as you can
 Bottom photograph
Even the white paint-bucket and make-shift brush can make an interesting subject. Don’t be afraid to move in close and fill your frame. This will cut out distracting detail and add more impact


1 comment:
The street light photo is wonderful. I aspire to take those sorts of images, to capture the detail and essence of a place with a simple and effective composition. I imagine this one is in Menorca? Cathy.
Post a Comment