30 Mar 2008

Cropping for more impact

In my last post I mentioned that I took a student who was with me for one-to-one tuition, down to my favourite cove on the seashore near my home - I posted a photograph of him down on the beach. Well, this morning I got a lovely email from Phil Hallam, who has put up some of the pictures he took on a webpage... it's worth taking a look..


Phil started taking photographs only ten months ago, so I think the results he produced during his day with me are all the more remarkable.

As I am never loathe to print a favourable comment, this is what Phil said about his day here in Galloway...

"Just a quick word to say thank you for an amazing day. I learnt more in one day with you than I have reading books or instruction manuals over the last 10 months."

Anyway, I introduced Phil to the idea of Photoshop and explained that many of the adjustments that can be made to a photograph after it has been taken are perfectly legitimate - cropping and darkening a foreground or sky, for instance. This is not 'cheating' in any way and it's not new. It's just a matter of using the old skills and modern tools that are available - the Victorian photographers were masters of re-touching and adjustment of an image in the darkroom, so Photoshop - or post processing with any imaging programme- is only a modern way of doing what is really very old hat.

When I was working full time using black and white film, I knew exactly what I was going to do to a photograph when I put the negative in the enlarger. I knew this at the time of taking the photograph - when the button was pressed. Now, when I work with digital cameras, I have a fair idea of what I am going to do to a photograph when I get it onto the computer. This 'post processing' is, to me, all part of the normal way of producing the picture as I envisage it in the real world.

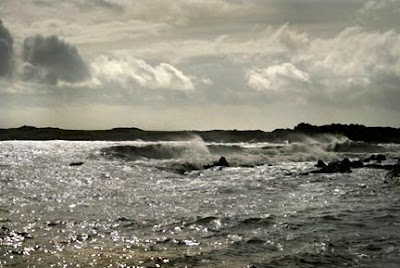
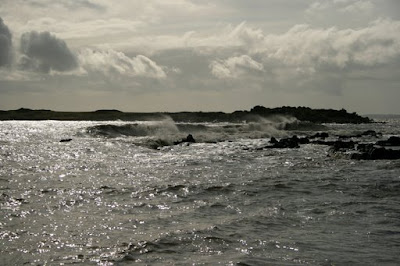
Above I have posted one of Phil's super shots he took during his time on the coast with me. This is the way Phil saw it and took it and posted it on his web page. It has not been cropped, or changed it in any way.

Below is the same photograph. However - hope you don't mind, Phil - this time I have cropped it a little and used the burning in tool and dodging tool to emphasize the dark storm clouds and waves. I would have done exactly the same sort of cropping, darkening and lightening if I had had this photograph in the darkroom. The idea is to maximise the impact of the photograph and to attempt to guide the viewer's eye to the most important elements of the composition. Notice that I have cropped a lot off the right hand side of the composition, but very little off the left hand side. This has put the waves more to the right so that the eye follows their movement to the left and brightest side of the picture. I agree that my crop has put the horizon pretty near the centre of the frame, but I think this is a price worth paying to get more visual impact from the movement of the waves.
Maybe you prefer this version, well that's fine, but I think you will have to agree that the cropped version does have more impact.


Hope to see you again soon, Phil.


28 Mar 2008

Photography tuition by the sea


My students Tony and Dave with RNLI Lifeboat man 'Tattie'

It’s been a busy week here in Bonnie Galloway. Quite apart from having several hundred photographs to sort and catalogue, I have had students with me for the last two days as well.

On Thursday pals Dave and Tony came for a shared day’s tuition. Dave has been to me before on one of my weekend workshops. This time he and Tony wanted to take things several steps further by doing a mini ‘assignment’ that would present a challenge. They felt they wanted to be ‘pushed’ a little, and could I arrange something.

I spoke to the local RNLI lifeboat secretary and got permission to take Dave and Tony along to the lifeboat station down the river here in Kirkcudbright Bay. One of the lifeboat crew members was able to join us for the morning and he proved to be not only great fun, but a willing and interesting photography subject.

The plan was to treat the morning as an assignment for an imaginary magazine editor who wanted a photo essay on the station and the lifeboat man. After they had got over their initial nervousness, both Dave and Tony did a fantastic job. They managed to find a couple of really good ‘key’ pictures and then set about gathering a whole range of really worthwhile peripheral, or detail, pictures. These included everything from the crews’ lifejackets hung in a row on the wall, to the winch that pulled the boat from the water into the boat shed, the inscribed plaques listing the number of rescues and rescued people, and shots of the boat’s powerful engines. By the end of the morning, they both managed to put together a really comprehensive photo essay, and everyone had a great time doing it. We went through the pictures together and did critique comments and advice during the afternoon

Today I have had Phil with me. He came up from Yorkshire for the day. Although he had taken up photography only 10 months ago, the moment I saw some of his work, it was obvious that he has a really good eye for a picture. He was less confident about composition and the workings of his camera, though. But we could soon help with that.

We spent the morning indoors as the rain lashed the windows and I went through each aspect of the camera controls with Phil. After lunch the sun broke through and we set off to my favourite little beach and cove. The light was truly spectacular, and the place presented a perfect situation to work on composition.

Phil was in seventh heaven shooting away happily. Whenever he had a query I would explain a few shortcuts and tricks. By the end of the afternoon, he was fully converted to the idea of the Manual ‘M’ settings on his little Canon 400D and wondering why he every bothered with the auto settings. I think we might be seeing more of Phil in the future

So another busy week comes to an end – have fun with your camera over the weekend.
Above: My student for today - Phil, at work on the coast near my home here in Galloway.
Below: One of the photographs I took during the afternoon - the light has been spectacular.

27 Mar 2008

A career in photography - 2


Photograph by Ron Burton


Here is the photograph by Ron Burton that I spoke about yesterday. This is the picture that inspired me to become a professional photographer over 40 years ago. It triggered my determination that some day I would work for a national daily newspaper. It had a tremendous effect on me - initially, I suppose because of my boyhood interest in aeroplanes, but it was much deeper than that. Before this picture I never thought that there was actually a real person behind the camera when pictures appeared in newspapers - here was a picture actually showing the face of the photographer right in the centre of the action - that's where I wanted to be, in the middle of the action.


It took Ron Burton six weeks to finalise the details and gain permission to fly with the Red Arrows. A Nikon F camera with a 21mm lens was fixed by the RAF chief engineer to the ejector seat in front of the photographer. The shutter was triggered by remote control. The Red Arrows normally fly in stepped-down formation so that each pilot has a clearer view of the aircraft next to him, but Ron persuaded them to fly stepped-up for this picture so that he could photograph them all more easily... quite a dangerous formation manoeuvre.


I seem to remember that Ron was working for the new Sun newspaper - when it was a quality newspaper! This picture was part of Ron's portfolio in 1965 when he won the British Press Photographer of the Year Award.


I met up with Ron some years later at another Press Photographer Awards ceremony in London - I was then working as a staffman on The Daily Express and had won the News Section with a picture of an armed police raid. Ron and I became friends. He was a true professional in every sense of the word.

26 Mar 2008

A career in photography - 1

After some considerable prodding, I promised that from time to time I would write about how I got started in photography, and some of the stories behind my career. So here goes, this is the first one...

I was fourteen years old when I decided I wanted to be a press photographer. I’d seen a photograph on the back page of Dad’s newspaper. They’d call it a ‘light bulb moment’ these days, but then, way back in the early 60s, something much more powerful than your average 40 watt bulb was ignited inside me. I knew at that moment what I wanted to do with my life.

The picture showed the photographer in the cockpit of one of the RAF Red Arrows jets. The camera, with a wide-angle lens, was in the front of the cockpit looking back and it showed not only the man who took the shot, but the tight formation of aircraft behind. It dawned on me that that man was not in the Air Force, yet there he was flying with the Red Arrows. That was the life of a press photographer, and that was what I wanted to do. Years later when I was a staff photographer on The Daily Express in Fleet Street, I met that photographer. His name was Ron Burton, and he became a friend. He was enormously pleased to hear that his picture had inspired a 14 year old kid to set off on a career in photography.

That very evening I announced my intentions to Mum and Dad.

“I want to be a press photographer. I don’t want an office job, and I really don’t want to work in a dirty old factory like Dad. I’d like to get out and about, and some of those London photographers get sent all over the world taking photos. Just you look at the pictures in Mirror. That’s what I want to do.”

Mum looked doubtful and I half expected a dressing down for saying what I had about Dad’s job at the diesel engine factory – it put the food on the family table after all. But Dad himself chipped in here. He paused from filling his pipe with the richly-scented mixture of St. Bruno and thick twist that bulged in his well-worn leather tobacco pouch and looked up.

“Now that’s what I call a proper ambition – see the world at someone else’s expense, and I don’t mean in the bloody army, either, square bashin’ and peelin’ spuds. Well paid, too, I’ll bet. You might even be famous and get your name in the paper one day. You give it a try son, I’ll write the letter for you if you like.”

That was it. Done and dusted - to Dad it was now all perfectly clear cut. With his total confidence in the talents of his only son it would be inconceivable that I would be turned down for a job as chief photographer on a top London daily newspaper. Not, that is, once he had written a letter asking the editor to give me a job. But then, Dad was also very sure of his own letter writing talents.

According to Dad’s bullet-pointed letter, those newspaper editors would be missing a golden opportunity, in fact they may even be negligent in their duty to their readers, if they did not immediately offer me a job.

When the letter was finished it was decided something was needed to illustrate my ability as a photographer. We hit upon the idea of enclosing with each letter a contact print of some of the snaps I’d taken with my new camera, an Ilford Sporty. The photos showed next door’s ginger cat, sat on the coping stones of the wall that separated the back yards of our houses. The cat had feathers stuck to his whiskers and a very satisfied expression on his face. At its feet, balanced across the apex of the soot-blackened wall, was the bedraggled corpse of a freshly-killed house sparrow. The Daily Mirror in particular was always keen on animal stories, so surely the editor would see from the evidence of this picture that I was an animal photographer of some distinction. These two-and-a-quarter inch square, black and white snaps of next door’s cat made up my entire ‘portfolio’.

I copied out the letters in my own hand, popped a contact print into each envelope and rushed down to the post office in the centre of town. Strangely, every editor wrote back within a week explaining that there were no photographer’s jobs available just then, but one of them did suggest helpfully that if the sparrow had been a little more chirpy he might even have considered using the picture in his paper. He also said it would be a good plan to get some more ‘hands-on’ experience with a camera before applying for a job in Fleet Street; perhaps on a local newspaper as an apprentice.

So Dad got busy again with his pen, paper and dictionary. He composed another letter to be sent to every weekly newspaper in a twenty mile radius of home. The replies came in dribs and drabs over the next few weeks, but each brought the same depressing news – there was still no prospect of a job when I left school in a few months time.

Right,” said Dad, who was beginning to take this as a personal slight on his letter-writing abilities, “Perhaps it’s more of a case of ‘not what you know, but WHO you know’. There are plenty of jobs like that, so maybe we should try and think of someone who might be able to help. We need what’s called a ‘contact’”.

He was absolutely right of course. I needed an introduction, a personal contact who could smooth the way a little; open a door just enough to get my foot in. With a solitary ‘O’ Level in art and a profound loathing of school, it was obvious that I had no future as an academic. Photography seemed to be the only job that would offer me the life I dreamed about. It was a job that had everything; travel, excitement, fame, the lot, and, as far as I could understand, you didn’t need to pass any exams to get to the top. My mind was made up, my heart was set on it; I simply had to become a press photographer when I left school after my fifteenth birthday. But after so many disappointing replies to all those letters, hopes were definitely beginning to flag. No one in the family knew anyone even remotely connected with journalism, photography or newspapers, perhaps it was hopeless after all.

Next - sometime soon - how I made my first 'contact'
25 Mar 2008

How to photograph moving water - part 2


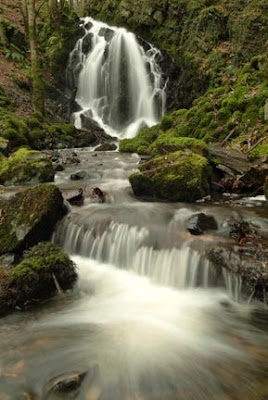
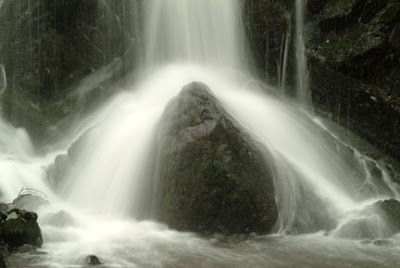
These two picture show just how easily you can allow your viewer’s eye to drop off the bottom of your composition. There are no hard and fast rules here, but generally, white or light areas in your picture will attract the eye – like a moth to light. So if you leave a bright white area at the edge of your frame – at the sides, top or bottom - your viewer’s eye will be attracted to it. Often it will not come back into the picture and the viewer will lose interest. The eye has a tendency to do this in the top photograph which has an intense white area at the bottom edge.

In the lower photograph I have moved the camera back a little to take the white area back into the frame and away from the lower edge of the composition. This darker foreground ensures that the viewer’s interest does not drop away. However, I do find the rock at the bottom of the shot just a tad distracting.

WHITE BALANCE
A word about white balance here when photographing this type of subject. In this situation the waterfall was in the shade of a deep ravine. That meant high temperature blue light. By all means experiment with your White Balance (WB) settings, but I tend to avoid Auto White Balance (AWB) in these situations because it can be difficult to achieve consistency between each shot due to the fluid ‘self-adjusting’ nature of the AWB mode - it can change the colour of your picture by very small degrees each time you adjust your composition. I found that setting the camera on the ‘cloudy’ white balance icon gave exactly the tones I wanted without making the water look too yellow. Using these WB icons, or indeed setting a Custom White Balance, locks the white balance on that particular setting, so the colours should not change between frames.

RECTANGLES
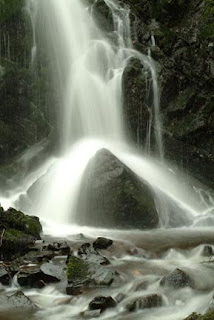
Once again I have explored the subject by breaking it down into a series of simple rectangles, and the two bottom photographs show just how different the framing can be of the same subject – if you think in rectangles. In this case, one horizontal and the other vertical. Remember, explore your subject – look for those rectangles. Your output of good photographs will multiply and you will come away from every location knowing that you have gathered every good picture that could be taken.

23 Mar 2008

How to photograph moving water - part 1

I had a great day yesterday with Yvonne and Phil who came all the way up from London for a day’s tuition here in Scotland. We spent most of the morning going through some basics on their cameras – with Yvonne keen to understand more about white balance and how to use the manual exposure mode on her Nikon D40.

The weather was good and after lunch we had the choice of either photographing one of the many coves just along the coast, or another of my favourite locations – a beautiful and delicately intricate waterfall that drops out of the Galloway hills not far from my base here in Kirkcudbright.

As Yvonne was keen to try out her skills with moving water – we donned our wellie boots and headed to the waterfall.

You can hear the roar of the waterfall well before I can see it. It’s very well hidden – a real fairy dell. The water drops about 40 feet down a sheer face, it’s stream splitting into several channels which tumble over blackened, mossy rocks. The fall was once used for industrial purposes, and some cast iron pipes still mar the pristine quality of the scene. These can be used as subjects in their own right, or, with careful framing be cut out altogether.

I suggested a simple shooting plan to give the shoot a sense of purpose. We did not rush in to get shots of the water right away, but stood well back and took a good look at the whole scene before me. There is no need to rush in these situations. Waterfalls do not run away, nothing is going to change except the light, and on an overcast day that is unlikely to change much, so take your time and consider each shot. I prefer an overcast day because it helps reduces contrast between the white water and black rock, and if the sun does shine through the trees it can soon create over-exposed hot spots.

We started by taking pictures that included lots of foreground. The green mosses made a startling foreground, so too did the branches of the dead trees.

A good solid tripod is essential if, like me, you prefer to create that mystical, fairy-like, movement in the falling water. You need very slow shutter speeds to do that, about 1sec for maximum effect with a small waterfall, and here overcast weather helps again. The less daylight there is, the slower the shutter speed you will be able to use.

In my DVd on Light and Composition (available from my website), I showed you how to look at the world in rectangles, and introduced you to an imaginary ‘Rectangle Monkey’ who always helps you think and see in rectangles – that’s the way the camera sees. Photographing a waterfall like this is a good time to adopt that way of thinking, because the actually face of the waterfall as it drops down the cliff is really quite two-dimensional, and it is a simple matter to divide the waterfall up into interesting rectangles – starting with the overall view and then framing different interesting areas in both horizontal and vertical rectangles.

CORRECT EXPOSURE
To find the exposure using Manual (M) exposure mode is simple. Knowing I need a slow shutter speed, I just set a very small aperture, f22 and point the camera at the subject (I prefer centre-weighted metering for this type of subject). Then I slow the shutter speed down until the exposure scale in the viewfinder tells me I have the correct exposure. At ISO 100 this gave me a shutter speed of around 1sec; perfect for the moving water effect I was looking for. You do not need fast ISO settings when the camera is on a tripod and you want to use a slow shutter speed… keep it low for best results and better quality.

The pictures here were taken by me on a previous visit to the waterfall – yesterday, I was far too busy helping Yvonne and Phil to get their photographs.

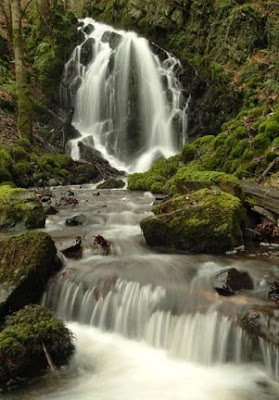
Lower photograph of the waterfall
I started with a simple wide angle shot of the scene, taking in lots of that wonderful green moss in the foreground with the waterfall away in the distance. One of the less appealing aspects of this view can be seen – the end of an old water pipe, just off centre in the picture. There was no way of avoiding this from this angle. A couple of clicks with the cloning tool in Photoshop will soon sort it.
Top photograph
I used the rushing water in the stream beneath the fall to make a lively, moving foreground that injected a real feeling of depth – the third dimension – to the composition. With the wide-angle lens I was able to stand right in the middle of the stream. Here’s when those wellie boots really come in handy
Also pictured above are Yvonne and Phil, my students for the day - they came up from London for their photography tuition
In part 2 I'll explain more about composition - and white balance

20 Mar 2008

Travel photography rating method


I have been extremely fortunate to have spent a great deal of my working life gathering photographs in some of the most interesting places on earth. Not always beautiful, but nearly always interesting.

You will notice that I use the word ‘gathering’. That seems the most appropriate way to explain the way I work. I really do go out there to gather pictures that capture something of the essence of a place. When I leave my hotel room and walk into the street I am in ‘gathering’ mode.

Quite apart from the fact that I have only ever been able to throw 100% effort into the things I undertake, there is another very good reason for this approach to photography. Getting to, and staying in, a place (travelling) is almost always the most expensive aspect of any photographic assignment. So my attitude is very simple: once I am on location, I work flat out to gather as many sellable pictures as possible. That doesn’t mean that I don’t thoroughly enjoy what I do, but the job has to pay and I have a job to do.

I rarely, if ever, worked ‘on spec’. I was always commissioned by a newspaper of magazine to photograph a particular country or assignment. When I was working for The Sunday Times, for instance, this meant they paid all the travelling expenses. Great, but that put the responsibility squarely on my shoulders to provide them with what they were paying for; to give them what they wanted – and more.

Over the years I adopted a very simple ‘rating’ system in order to cut down time wasted on trying to capture pictures that were never going to ‘happen’.

When I see a subject that I think has good visual possibilities, I will, in the back of my mind, give it an instant time rating. I might, for instance rate a subject as just ‘two-minutes’ and will expend just two minutes exploring it and trying to realise its potential. If it fails to produce a worthwhile photograph that pleases me in that time, I simple drop it down a hole and move on. I’m afraid I apply the same rating system to some people too while I am working – time is just too valuable to waste. This may appear calculating and cold-blooded to photographers who take pictures purely for pleasure.

If I believe a subject has tremendous picture potential it will, of course, get a far higher time rating, and I will be prepared to wait many hours for that special shot. The picture of the gondolier above was a ‘three day’ rating. I saw the potential of the shot as soon as I saw this particular canal corner and the way the sidelight was striking the buildings facing me. But think of all the ingredients that were vital for the success of a picture:

I needed a gondola in the right place.
The gondolier had to be positioned precisely between those two window.
He had to be wearing the proper straw hat.
He had to be pushing the gondola along
There had to be the hint of a passenger in the boat
The lighting had to be coming down the alley from the left.


I went back each afternoon when the light was perfect and waited for about one hour. I photographed many gondolas passing down that canal, but only on the third day did a get exactly what I wanted and what I had envisaged on that first day.

19 Mar 2008

Aperture Value - correction

I'm sorry - yesterday I got it wrong.

When talking about the way I set the exposure for the live gig, I incorrectly said that I set the camera on Shutter Priority (TV) mode, then set a wide aperture and let the camera decide on the shutter speed. This, of course, is dribble.

I meant to say - set a wide aperture using AV (Aperture Priority) mode and let the camera decide on a suitable shutter speed.

Thanks to Alwyn for drawing my attention to this silly mistake. I have now corrected the wording of yesterday's post.

There, confession over - I feel better now.

18 Mar 2008

Photographing live gigs - part 2


I arrived at the theatre early, well before the start of the show so that I could check out shooting positions and angles. The stage had very limited access to the wings and as the best shots are often taken from the side of the stage, this would make things quite difficult.

The only way to get into this position would be from the front of the stage, so the band had to be happy for me to move up there between songs. Access to the back of the stage, where I could shoot from behind the band, was easy and I checked out all my routes from one position to another while all the house lights were on. I had put a small torch in my pocket so that I would not be stumbling around in the dark when I went back stage during the performance – it would be very dark there then.

I even managed to gain access to a small lighting gantry above the audience from where I could use a telephoto lens for frontal close-ups of the band. During the show, I dodged from one position to the next, and often back again.

As I was on the move and adapting to the different light conditions and positions of the performers, I left my bulky camera bag safely locked in a dressing room and operated with two camera bodies and two lenses.

With the stage lights constantly changing intensity direction and colours, you may find it useful to use the Aperture Value (AV) exposure mode. Remember, this is more correctly called the Aperture Priority (AP) mode. Just set a wide aperture and let the camera decide on the shutter speed. However, I prefer to use the basic M (Manual) mode whenever possible, so that I can change the exposure myself as the lights change. It is also more reliable if shooting directly into bright stage spots – a situation that can confuse any automatic metering mode.

ISO
I set my ISO to 800 with the certain knowledge that I would need the fastest shutter speed possible to stop any action. This would result is some loss of quality, but that was a price worth paying.

EXPOSURES
Most of the shots were taken at between 1/60sec and 1/125sec at f2.8 or f4. Of course these shutter speeds are pretty slow for stopping action, and there were some failures when I pressed the button as the subjects moved, so it was important to take lots of pictures so that these could be discarded. The camera’s LCD illuminator is invaluable when checking settings in the dark in the dark.

WHITE BALANCE
You will never win completely when the stage lights are changing from bright blue to deep red. I simply set AWB (Auto White Balance) and let it happen. Any adjustments I made later in Photoshop.

LENSES
The most useful lens proved to be the 17-35mm f2.8. With this I could get really close from the side of the stage and include the stage lighting in the shot for dramatic effect. For the long shots from the lighting gantry I used a 70-200mm f2.8 zoom. I don’t often bother with lens hoods, but in these conditions, with lights shining into the lens at an angle, I made sure I had a hood fitted to avoid flare

Top photograph
Doug Carroll may not be as famous as Mark Knopler, but he is one of the most gifted guitar players in the UK. I wanted to get a picture that really summed up his total immersion in his music when he played solo. I liked his natural pose with the spotlights shining down on him through the stage smoke. Stage lighting is mostly from front and back of the performers, so if you are photographing a band from the wings you will not be shooting directly into the light

Lower photograph
From the lighting gantry just above the audience I was able to use a telephoto lens and get reasonable close-up shots of the band. The light behind Mary was flashing on and off and changing colour so there was an element of luck involved in getting a good facial expression with the right light backlight


TIP
Earplugs are essential for photographers working directly in front of a powerful sound system. It’s LOUD. Over the years, I've covered dozens of rock bands' live gigs - from the Rolling Stone’s, Rod Stewart, Freddie Mercury. I hate to admit this, but I've covered The Beatles as well – and my hearing has never been the same.

If you want to know more about Doug, Mary and the The Mary Barclay Band - or buy their music - go to...
http://www.sensationalmarybarclayband.com/
http://www.myspace.com/sensationalmarybarclayband

16 Mar 2008

Photographing live gigs- part 1


Want a challenge? How about shooting a live stage performance? The lighting will be tricky, but the results can be great.

Whenever I think of really difficult light conditions I think of live stage performances – especially of rock music. Few situations present the photographer with more challenges than a live pop concert. Everything is difficult – for a start, the amount, contrast and colour of the lighting is likely to change every few seconds and the performers will be moving or jumping around the stage. You will be working immediately in front of a sound system so powerful it can easily damage your hearing, and behind you the paying audience will not be at all pleased if you block their view of the stars on stage.

I was reminded of all these problems at the weekend when we went to enjoy a gig by a fantastic local band here in SW Scotland. I was not working – just there to enjoy myself, but at the band’s last gig in the same theatre, I did take lots of pictures. Singer Mary Barclay and her husband lead guitar Doug Carroll, of the ‘The Sensational Mary Barclay Band’ are personal friends of ours, so it was a job done with real pleasure.

If you decide to try this type of assignment yourself, it will really test all your skills in timing and camera craft. The result can be great set of pictures and a tremendous sense of achievement. Most rock groups and musicians, except famous professionals, will be only too pleased if you approach them and ask if you can photograph one of their live gigs. However, it’s always best to check with the theatre manager well before the event.

Who knows? the band may become famous one day and then your pictures might be worth a small fortune. In the case of The Mary Barclay Band, they really do deserve stardom and fame. Mary has a fantastic voice and Doug is one of the finest lead guitar players in the UK – if not beyond. The band now write and produce much of their own music and songs.

If you don’t fancy rock music, there’s sure to be an amateur dramatic society putting on live theatre somewhere near where you live.

I’ll go into the technique side of photographing this type of subject in part 2. Meanwhile I can recommend you listen to some of the band's music at…

http://www.sensationalmarybarclayband.com

http://www.myspace.com/sensationalmarybarclayband

Top photograph
This was real hard rock number and I was just about to move position from the stage wings when I noticed that Mary came across to Doug and they stood back to back. The level of lighting had dropped quite a lot and I was down to 1/45sec – not ideal for freezing the action, but by firing the shutter exactly as Mary’s arm reached right up, I was able to get everything reasonably sharp. This is my favourite shot


Time spent working from below the stage and in front of the audience has to be kept to a minimum because you may be blocking a paying customer’s view. Try to work from one side of the stage if possible, but you don’t want to get too close or too low down because with a wide angle lens you will get distortion and the figures will look ten feet tall. Also, you may be looking straight into the glare of the lights from a low angle. This shot of me working in the wings is by John Scott

14 Mar 2008

Photographing with multi flash


Here’s a picture – a very simple one, with no pretensions to be anything other than a demonstration shot. It shows the group of photographers who joined me last week to learn more about portraiture.

I was showing the group how to get the best from their flash guns both on and off the camera, when I decided to show them the old technique of firing multiple flashed on one exposure – with just one flash unit of course.

I was taught the technique by a photographer called Arthur Partington when I was just a 15 year old apprentice on a local newspaper. In those days staff photographers like Arthur were expected to turn their hands to every job that came in to the office – and that included news, features, weddings, some commercial work, and advertising. Arthur had the task of photographing a carpet warehouse in an old converted cotton mill. The floor area was vast, the ceiling fairly low and supported by dozens of steel pillars. The whole place was covered in rolls of carpet. The client wanted to show the scale of his operation by having the entire warehouse area photographed and the picture printed in a full page ad in our broadsheet paper.

One winter evening, Arthur went prepared with his Speed Graphic 5 x 4 glass plate camera, a heavy wooden tripod, a huge bulb flash gun, an empty shoulder bag and another containing about a dozen PF1000 flash bulbs (I think that’s what they were). These old-fashioned flash bulbs were about the size of a large orange and often exploded when they were fired.

And Arthur took me. I had a particular job to do.

First he found his best angle and set the camera up on the tripod. Then he turned to me and walked me right around the warehouse floor showing me exactly where and in which direction he wanted me to let of one of the flash bulbs. I was under threat of death if I got it wrong. Every time I let off a flash bulb I would have to be hidden behind one of the pillars. Right. Arthur eyed my with distrust and asked if I was ready. He pulled out the sheath from the slide holder. Opened the shutter on ‘B’ and told me to Go!

Oh, I almost forgot, before he sent me off, he turned off most of the lights in the warehouse. I could barely see where I was going.

A raced around that warehouse blasting off flashes as I went. Each time I fired a flash bulb it had to be unscrewed (burning my fingers), the spent bulb dropped into the empty bag and a new bulb screwed into the flash gun ready for the next blast. Three times bulbs exploded with a terrifying bag, spraying me with fine shards of glass. Each time Arthur yelled – “Don’t stop you little bugger, keep moving”.

By the time I had fired the last flash bulb and Arthur had closed his shutter, I had covered the equivalent of a 200 yard sprint under heavy fire in the dark. I was gasping for breath and shell-shocked.

“Right”, said Arthur. “Get that camera packed up and we’ll get off home.”

I watched Arthur develop the glass plate and print the photograph next morning. I could hardly believe my eyes. It was as though the entire warehouse had been lit with studio lighting. It was beautifully lit.

Well that’s a mighty long explanation for the method used to take the picture above. All I did was darken the room. Stick the camera on a tripod. Tell the subjects to keep dead still, opened the shutter and dashed around everyone letting off the flash gun. Closed the shutter. No cables, no infra-red, no wireless-systems. None of that is needed… just you with a flash in your hand The flash was fired four times.

I admit it’s not ideal – some of the shadows are in the wrong place, one flash has looked into the camera (over the shoulder of the man sat on the left) and another has lit part of my red sweater (over on the right). But as a quick two-minute demo it was very effective.

You can try this at home. It’s great fun and you’ll learn lots. Multi flash pictures can have an extraordinarily powerful visual appeal if you get it just right.

13 Mar 2008

Photographing with Autofocus mode

Following on from the posts of Ken Terry's beautiful wildlife shots of squirrels and red kites, I had a comment from Dorcas, who asked if there is a technique to using Servo Autofocus, or whether it is just a case of practice to get the best shots.

As I am not a Canon man, I thought the best person to answer the question would be the man who actually took the pictures, so I asked Ken for his response. Ken says...

"Canon's terminology is actually AI Servo. Different cameras have different terminology and different characteristics, so it is important to know the characteristics of your camera. Canon's 1D MKIII can be programmed using custom settings for individual use. For example the settings for a wildlife photographer would be different from a sports photographer. I only had the camera just over a week when I took the shots of the kite so I'm still learning the camera's capabilities.

The basic technique for using AI Servo is to pan the subject keeping the Autofocus point in the viewfinder on the subject. Again this autofocus point varies from camera to camera and in the case of the 1D MKIII this can be expanded and assist points can also help. This is part of programming the camera to your individual needs.


If you practice to start with on subjects that move in one direction at a steady speed such as a car it helps to get a feel of what is needed. The problem (and the fun) of photographing moving wildlife is that you never know what direction they will turn next. This is especially true of birds that can travel quickly up and down as well from side to side.

So to sum it up, you need to know your camera, you need to practice panning on steadily moving subjects to get a feel for it and finally practice on the wildlife.

I missed loads of shots while photographing the kites as I would just gain focus and then they would dive."


So there you go - straight from the man himself. Hope that helps.
Thanks Ken.

12 Mar 2008

Photographing wildlife


Photograph by Ken Terry


I just couldn't resist showing you this lovely photograph by my student Ken Terry. He has just posted it on the photoactive_photographers group and I think it's gorgeous. It is one of his series taken on his big Canon 500mm telephoto lens while he was here in Galloway over the weekend.


Beautiful timing, lovely angle - it has tremendous appeal.


Ken and other students of mine have got lots of pictures in the photograph albums on the group, and it's well worth taking a look. The group is actually open to anyone. You are welcome to join in and certain of a warm welcome among friends.


Aperture Value

Carl posted a comment yesterday about Ken Terry's beautiful wildlife pictures.

Ken said that he used ISO 1000 and an aperture of f5.0 in AV mode as the light was changing so quickly. Sometimes the shutter speed was 1/500 and sometimes 1/4000.

Carl commented:
...really enjoyed this. But trying to work out what AV is, in relation to rapidly changing light?

'AV' - Aperture Value - is an automatic exposure mode in which you set the aperture you want and the camera decides on the correct shutter speed to match it. This can be very useful in rapidly changing light conditions like those Ken experienced when he was photographing the red kites and the red squirrels. In these conditions it can be difficult, if not impossible, to constantly adjust the exposure manually. In other words, you just cannot keep up with the fast changing light levels by correcting the exposure yourself in the Manual ('M') mode. When shooting a fast-moving subject like a bird in flight, operating the camera quickly is vitally important, so setting the exposure mode to an automatic setting can be a boon and one less thing to bother about.

So in Ken's case, he set f5.0 in 'AV' mode. When the sun went behind cloud and the light level dropped, the camera chose a shutter speed 1/500sec. When the sun came out and light level went up, the camera chose a shutter speed of 1/4000sec.

Some time ago I posted a photograph of Freddie Mercury. Click the link below. I used 'AV' exposure mode for this because the stage lights in the studio where the photograph was taken were constantly going on and off, with light levels going up and down. It would have been impossible to keep up with the exposure manually in 'M' mode, so I set something like f2.8 in 'AV' mode and let the camera sort out the shutter speed.

Just one tip here... Aperture Value (AV) used to me known as Aperture Priority (AP), far more sensible and descriptive. Until some fool decided to change it.
http://philipdunn.blogspot.com/search?q=mercury

11 Mar 2008

Wildlife photography

Ken Terry, one of my regular students for some years - and now a good friend - wanted to tackle some wildlife photography before he spent the weekend with my group learning more about portraiture in the comfort of the Cally Palace Hotel.

Ken owns some pretty neat kit and the three wonderful photographs here show that he really knows how to handle it.


I arranged for him to spend a day with Wildlife Ranger Keith Kirk, who knows the area and its wildlife extremely well. Keith took Ken to a secret location to photograph red squirrels and then, despite the cold and rain in the afternoon, Ken got an opportunity to photograph the spectacular red kites, which have been part of a successful re-introduction program here in SW Scotland.


Ken captured some great shots of both the squirrels and the red Kites, and I thank him for permission to post them on the blog. Wonderful photographs Ken. Very well done.


Equipment used: Canon 1D MkIII, Canon 500 mm LIS f4 lens mounted on a Manfrotto 055PROB tripod fitted with a Wimberley version II head. Ken used ISO 1000 and AV as the light was changing so quickly that sometimes it was 1/500 and sometimes 1/4000. It was windy and raining, but the cloud thickness varied.

This is how Ken set up the camera for each shot...


The top picture of the red kite:
AV, f5.0, 1/4000 sec, ISO 1000, Servo AF.

Lower picture of the red kite with its talons in the other bird's tail feathers:
AV, f5.6, 1/1600 sec, ISO 1000, Servo AF


The squirrel, below:
AV, f5.6, 1/320 sec, ISO 800, Single shot AF?


10 Mar 2008

Portraiture weekend

Well, we've just had a fantastic weekend with a great bunch of people at the grand old Cally Palace Hotel here in Galloway. The theme was portraiture using flash and available light. I think everyone had a great time. Some travelled very long distances. Cliff flew up from the south coast of England, Russell came down from the wilds of Inverness, while Bob came all the way from The Isle of Man. Alwyn was the lucky one - he travelled just a few miles. One of the truly rewarding aspects of doing this tuition is that so many people come back again and again, and this weekend was no exception. Only Bob and Cliff had not been to me before either to Scotland or Menorca. Hopefully we will see them all again soon. It was also great to see Maria, a regular student of mine, she couldn't make the whole weekend, but travelled from Edinburgh just to say hello and meet everyone.

Anyway, thanks to Ken, Cathy, Bob, Russell, Alwyn, Peter, Cliff for making the weekend so enjoyable. Oh, and thanks to Tom, our model, for the day.

I have embedded a short video below to show the gang at work.

This morning I got a lovely email from Cathy, one of the participants.

Well, Philip, you did it again! Worked your magic on a group of (almost)
total strangers, so that we all had a wonderful weekend of learning and fun.
Thank you!!
And thanks also to Norene for the organisation and patient posing, and to
Tom for his patience and good humour.


Thanks Cathy - and the whole gang.

9 Mar 2008

Comment of Canon G9

Blogger was having problems yesterday and this message from Lifespy seemed to get caught up in it. It appears on some pages, but not on others. So I have posted it here.

The answer to Lifespy is that no, I haven't tried this technique, but I will. I normally pre-focus by half pressing the shutter button in order to speed things up. By the way, his blog is definitely worth looking at and I will place a permanent link to it asap.
Thanks Lifespy.

Hi Philip,
Have you tried using the canon g9 in "snap shooting" mode using hyperfocal distance settings and then saving them to C1 or C2 (like using a rangefinder in street photography). I would be interested in your comments on this. I dd an article on it with how to set it up here: http://lifespy.wordpress.com/2008/02/12/setting-up-snap-shooting-mode-on-the-g9/
I'll be back to read more and I have add you to my blog roll :)

A Practical Guide to Press Photography - 1

Over recent days I’ve posted some short passages from my book published way back in 1986 by Oxford Illustrated Press, ‘A practical Guide to Press Photography’. This book became a standard work in universities and colleges, and I heard of many college tutors who would read passages straight from it as part of there lectures. Anyway, I’m persuaded that much of the information in the book is just as relevant today as it was 22 years ago. As I’ve no intentions of re-publishing the book, I’ll be posting short passages from it from time to time – updating the information as I go. There are many tips that are just as useful to the hobbyist photographer as they are to the professional or aspiring photojournalist….

You can call a photojournalist a literate press photographer if you like, but I’ve always assumed that the two titles describe one and the same person. That is – someone who makes his or her living by taking photographs for publication in a newspaper or magazine. In the true sense of the word, I suppose a photojournalist should be capable of seeing the job through from start to finish: conceiving an idea, organising the assignment, taking the photographs, writing the story to go with them, and presenting the finished results as a useable package to an editor. Whereas a press photographer is more likely to be sent on a specific assignment determined by the editor and be responsible only for getting the pictures. A reporter will take care of the words.

The idea of reporting events in pictures is far from new . It goes back to the Stone-Age and beyond when primitive man first daubed hunting scenes on the walls of his cave. It happens that things are a little more sophisticated today. Mind you, looking around at present social trends, I sometimes wonder. However, the desire to convey and receive information in visual form is still just as strong. Pictorial reportage can transcend obstacles of language, race and culture to become a universal language of communication. However, it would be naïve to run away with the idea that all newspaper photographers are blessed with the missionary aim to change the world with the impact of their pictures. To most it is just a job like any other, and often a tedious job at that. Only on infrequent occasions will the average press photographer be well-placed to put across any sound of profound message in pictures; major stories and the type of on-the-spot news events that produce award winning pictures just don’t happen in front of every photographer every working day.

For the most part, the photographer will be involved in the manufacture of entertaining pictures from run-of-the-mill, and often re-hashed stories to feed the conveyor belt demand of a newspaper, be it local, regional or national.

I started work straight from school at the age of fifteen as a tea brewer and printer of the photo-sales on a local weekly newspaper. Having progressed through an apprenticeship, agencies, evening newspapers and freelancing to a staff position with the Daily Express, and then to have returned to freelancing again, my experience is fairly wide. However, no single photographer could hope to acquire a complete knowledge of every branch of photojournalism… the subject is just too diverse and life just too short. My aim with those posts is to pass on some of the proven techniques and short-cuts and to increase the understanding of press photography – not only to aspiring photographers – but to editors of all publications using the services of photographers.

I hope you enjoy the posts and look forward to your feedback and comments.

7 Mar 2008

Photoactive Photographer's group

Photograph by Paul Lipman


I am proud of the fact that some of my former students started a discussion group through which they share pictures and information. The group's first photo project has been completed and yesterday I had the job of commenting and 'critting' the pictures and of choosing my favourite picture. This was not a competition, just a project aimed at getting everyone out there taking more photographs. It is open to all levels.

I have to say the results were fantastic, and I have posted my personal favourite here. This doesn't mean it is the best photograph, just the one I connect to most of all. It was taken by Paul Lipman, who has been to me here in Scotland for tuition and also been on one of my holidays in Menorca. Paul has a natural talent and all I can say about this picture is - I wish I had taken it myself. It's a cracker.

This morning Paul emailed me to say:

"I was thinking of you when I took the man and dog picture!
You mentioned in one of your blogs(hate that term!) how you saw a man walking down the road and arranged to be at the point where he came upto a green door. I did the same thing with the entrance to the rear of the old building."

Well that does my heart good, Paul. It's always great to know when the teaching pays off.

Well done Paul and all the rest of the group. Great stuff. I'm looking forward to seeing the results of the next project - but it will now be Paul's job to decide what that will be.


If you would like to join in with the group, you'll find it at http://groups.yahoo.com/group/photoactive_photographers/

You will be given a very warm welcome.

6 Mar 2008

Using Light Zone software

Again regarding yesterday's post, another former student, John Hamshaw, sent me the following email...


Hi Philip

Used Light Zone - took 2 minutes

http://www.lightcrafts.com/index.html

Best wishes
John


John took the time and trouble to work on Peter Frisby's photograph in this Light Zone software to lighten the dark areas. I have posted the final results below. I have to say I can certainly see a difference, but the downside is some serious posterising - especially of the clouds in the sky. Maybe this is because the file John used was so small, but it doesn't look too good.

Thanks for going to so much trouble John.


I've looked at the Light Zone website briefly. It looks interesting. You may have to kill the sound on your computer is you can't cope with the irritating sound of shutter clicks. So far, I think I might stick with that dodging tool in Photoshop. Take a look for yourself by comparing the two results.


I'd be interested in any further comments about this software.


Photography by Peter Frisby

Photography tuition

I'm 'almost' embarrassed to post this, but I'll get over it somehow. This was from Peter Frisby, whose picture I posted yesterday. Come on, I'm allowed a plug every now and again...

Philip and Noreen,

First and foremost many thanks for the 2 days. I looked forward to coming and was not disappointed. Secondly I think I have failed miserably to post a comment on the Blog. I have tried but my IT skills or lack of them have let me down.

I tried to send a comment along the following lines so please feel free to post it:

" Philip, Thank you for a super couple of days. Philip has an infectious zest for photography and indeed life. For those of out there who are hovering go and have a 121 with Philip. You won't regret it.

Philip, I am just off down the pub (wth the Ixus for a couple of pints of Banks's)"

All the bestPeter

Thank you Peter. I'm delighted to hear you will now be joining us for the Photography Holiday in Menorca.

Some while ago I wrote something about posting comments that might help others if they are finding commenting a problem...
http://philipdunn.blogspot.com/2007/12/leaving-comments.html

5 Mar 2008

Photographing shadows and highlights


Photograph by Peter Frisby

I've had a great couple of days here in SW Scotland with Peter Frisby from Staffordshire. Peter came to me for some one-to-one tuition. The weather was beautiful and I took him to my favourite hidden cove down on the sea shore on the first day. The light was really spectacular with a pastel blue sky and lots of dramatic clouds. Absolutely ideal for landscape and seascape photography.

Despite the fact that Peter has been taking photographs for only a very short time, he has done a great deal of reading on the subject, so he had a reasonable grasp of the fundaments of exposure.

One of the things that was confusing him was the situation in which a landscape might have a foreground in shadow and a background brightly lit. I explained that there were several methods of dealing with this very common and quite difficult situation. The photographer is faced with a choice of (A) exposing for the shaded area - so allowing the bright background to become over-exposed and 'burnt-out'. This always looks dreadful. (B) Exposing for the brighter area of the picture and allowing the shaded area to go dark. (C) Compromise and interpolate the exposure between the two extremes - rarely very successful. Most frequently (B) is the best.

In the real world, you have several options open to you to combat the problem.

1 - Use a gradual grey filter to darken the bright background in the upper section of the picture.

2 - Put the camera on a tripod and take two shots from precisely the same angle. One exposing for the shadows and one exposing for the highlights. These can then easily be put together in Photoshop using the Layers Mask. This is a highly effective and probably the best way of doing the job.

3 - Expose for the highlights and - if the foreground is not totally black - subtley lift some detail back into this area using Photoshop's Dodge Tool facility. I work on the principle that an under-exposed area of an image can be lightened to reveal detail, while an overexposed, burnt-out, area is just about hopeless.

Peter has not yet got to grips with Photoshop, so when he spotted the photographed the scene above, we had an ideal oportunity to demonstrate option 3. He exposed for the brightly lit far distance, and allowed the foreground to go dark. Once opened in Photoshop when we got back to base, we simply selected the 'Dodge' tool with a large brush at about 8% transparency to lighten the highlights. Several passes were made over the foreground to achieve the results shown. I don't have Peter's original to show you, but I can assue you that foreground really was very dark indeed.

Now just in case you are tempted to get all 'precious' and sniffy about 'manipulating' an image in this way, just remember that those icons for the 'Burn' and the 'Dodge' tool come straight from the darkroom. The 'Dodge' icon represents the bit of round card we used to cut out and stick to a short length of stiff wire. Photographic printers would jiggle this 'dodger' about over over a dark area of the print during exposure in the enlarger. The effect was to lighten that area. The 'Burn' icon is a representation of the printer's hand making a hole through which he would direct extra light to a particlular portion of the print in order to darken it. So, you see - there's nothing new about Photoshop - the Victorians were using the same ideas over 100 years ago.


Peter (that's him above at work in Kirkcudbright Harbour) was using an Olympus E-510 and I have to say I was very taken by it. It handles very well indeed and I was impressed by the results. Peter's shot of the shells (below) is needle sharp.

4 Mar 2008

Learning to be a press photographer 3

On my sixteenth birthday I bought an old Vespa motor scooter and really learned what it meant to be ‘out on the road’. I fell off that thing at least once a day. As this usually smashed all the glass plates which I carried in a battered leather camera box strapped to the back of the scooter, the chief photographer ordered a special batch of ‘unbreakable’ 5 x 4inch celluloid film from Kodak. This didn’t stop me falling off the scooter, but it did mean that I no longer had to spend half the morning developing the pieces of broken glass plate negatives from my ‘night jobs’, and the rest of the day fitting them together in a sort of panchromatic jigsaw… many a Rose Queen’s ‘royal’ portrait has been scarred by the marks of sticky-tape across her pretty face.

Unlike the young photographers who enter the newspaper world today, for me there was never enough time to attend college to learn more about the theory of my chosen profession. I was kept far too busy taking photographs and getting them in the paper. But, I the little time I had to spare, I devoured photography books and studied the work of top Fleet Street and magazine photographers.

It was difficult within the constraints of an old-fashioned local weekly newspaper to indulge some of the new and wonderful ideas I had learned from my books and magazines, and many of the pictures I produced were received with something less than enthusiasm.

One occasion, the chief photographer took me on one side for a quiet word: looking at my latest creation and shaking his head solemnly, he said: “Bit too arty, lad. Too arty. It’s faces what sells local papers, faces – and I don’t mean like t’ bloody Mona Lisa.”

3 Mar 2008

Learning how to be a press photographer

Printing the photo-sales for that local newspaper was a trial of strength and endurance for a fifteen year old. I trial for which I was ill-matched. But I would put extra sugar in my tea and, on my day of, I would hump around a heavy Dawes 5 x 4inch glass plate camera and fantasize that I was a fully fledged press photographer. My mother encouraged this self-delusion when she bought me a trilby hat (come on, it was the 1960s), but I could never quite muster the courage to stick a press card in the hat band. Besides, I was too young to join the union.

My travels started soon after I changed jobs and joined the town’s rival newspaper as an apprentice photographer: I was given the address of a local church hall and ordered to catch a number 17 bus to go and photograph a dress rehearsal for a church pantomime. I quickly became an authority on the town’s bus routes and looked so young that I was still able to use my school bus pass, travel for nothing and claim the fares on my expenses. It didn’t take long for the bus conductors to get suspicious though, and pretty soon the word went round to kick me off on sight – camera bag and all.

In those days we worked every evening on ‘night jobs’ – photographing functions and events from racing pigeon club presentations to up-market dos in the Mayor’s parlour at the town hall.

Most evening we would have maybe ten ‘assignments’ to cover and none of the club secretaries, society presidents or event organisers who had invited the newspaper to their functions seemed to want the photographer to attend before 10pm. Some of my colleagues would be kept hanging around all night by a local ‘big wig’ who demanded that they ‘run along and come back at ten o’clock’. I would have none of this and, by employing tactics of diplomacy, cunning and downright cheek, I would have a group of people organised and a photograph taken before anyone had time to object.

My workmates soon cottoned on to this ability of mine and, in return for driving me around in the firm’s mini-van, I would take on their jobs as well as my own and we would still be finished before ten. It was not uncommon for them to drop me at the door of the town hall and I would out again with the job done before they had turned the van round.

The technique was simple and has stood me in good stead ever since. Whenever possible. cut out the middle man who is likely to have an inflated idea of his own importance or be frightened of his job. Either go straight to the top or ignore the hierarchy altogether – just get the picture that matters.

2 Mar 2008

Learning how to print black and white

When I visited the Focus on Imaging show at the NEC in Birmingham last week, I happened to be attracted to the Ilford stand. Now I can say with pride that I have won many awards in what used to be the Ilford Print of The Years Competitions in the past, so naturally, I took a close look at some of the winning prints.

I saw one print that was definitely out of focus in the enlarger and the quality of the print left a bit to be desired. Perhaps it’s because so few photographers are competent with film printing these days. Standards must have fallen.

Now when I was a lad…

I don’t suppose many professional photographers have started their careers on their hands and knees, but that is what happened to me. My first job after leaving school clutching my solitary ‘O’ Level in art – the only examination I ever took - was to print the photo-sales for a local weekly newspaper. For this mammoth task (there were hundreds of black and white prints to do every day) I was given a suitably elephantine piece of equipment – a gigantic, old-fashioned horizontal enlarger.

If you have never seen a horizontal enlarger, and in this day of digital, there is no reason why you should have, you’ll have to imagine a 19th Century lantern slide projector running on rails about 6 feet long. I blame this obstinate colossus - all mahogany, brass, and leather bellows, for my permanent stoop and stunted growth.

The inventive and sadistic chief photographer had mounted this enlarger against the wall, vertically, to save space. A large hole had been sawn in the ceiling above to accommodate the lamp house that housed a light bulb the size of a football. Even so, the brute was still so long that in order to print anything bigger that a whole-plate, the baseboard had to be put on the floor. It needed to of us to heave the lamp house up the rails to print a 10 x 8. That bulb got so mad hot that smoke would filter though the ceiling into the typing pool upstairs.

Oh how I wished that dreadful thing would go up in flames.

Despite the size and power of the bulb, by the time its light had travelled down to the lens through the enormous condensers, it barely had strength to trickle onto the printing paper. Exposures of quite extraordinary duration were called for and these had to be timed by counting the seconds in my head. There was no darkroom clock, and I couldn’t afford a watch on £3 a week. I dreaded orders for multiple prints.

These long exposures and the monster’s instability in its unnaturally upright position, meant that if anybody in the building slammed a door while I was counting, the condensers would get the shakes, the print would blur and I would have to start again and make a fresh one. This terrible state of uncertainly shredded my youthful nerves and, to help me relax after work my older colleagues would sneak me into the local pub, where they taught me to drink pints of strong beer, several years before I was legally entitled.

I was only allowed out of the darkroom for tea breaks, and then I would come out blinking like a bat, to brew-up for an ill-assorted bunch of dissipated press photographers. The tea was so strong that if stripped the glaze off the mugs. During these tea breaks I destroyed my taste buds and learned a great deal about bad language and photography.