 You must be able to recognise the particular attributes, advantages and disadvantages of any light source instantly. This will let you to get exactly what you want from every subject.
We’ve already looked at sidelight, but just to re-enforce how useful it is take a look at the superb sidelight used in the photograph of the young student. The picture was taken in an open doorway – a very useful location for finding sidelight – especially when the sun is high in the sky - see today’s TIP.
Roughly, the direction of light can be divided into side, front, back and toplight.
Bear in mind that in the real world the direction of light might be a combination of some of these headings…. ‘toppy-back’ light, for instance - there’s a new word for you. Sometimes the light may be totally non-directional. You won’t always be able to change the direction of the light – but often you will be able to adjust your shooting angle or the position of your subject in order to make the most of what you have. For instance, you may be able to time your visit to a certain location to coincide with the direction of light that will show it off best. Sadly, this is not always possible especially for professional photographers under pressure of time and deadlines. They will have to resort to all sorts of tricks – but I’ll tell you more about those in future articles.
TOPLIGHT
This is the one to avoid whenever possible. Professional travel and landscape photographers work both ends of the day – morning and evening. That’s because the light source, the sun, is low in the sky and can be used as front, side or backlight. With the light directly above, portraits look horrible. Landscapes and buildings look boring and no matter in which direction you look at it, the light remains the same.
 Photo 1 Ugh! Toplight. This is the one to avoid whenever you can. It’s midday and the sun is high overhead – definitely not a time to take portraits like this – especially if your subject is wearing a big hat. Avoid it. Come back later or ask your subject to step into a doorway where you can use sidelight – anything to avoid toplight
BACKLIGHT
Shoot into the light and put the light source behind your subject and, in the most extreme case, you will create a silhouette - emphasizing outline shape. Backlight does not have to be quite so obvious, though, and with a little diffusion from such things as clouds or reflectors, it can create a soft, subtle ‘atmosphere’. I’ve already touched on this when I wrote about the ‘quality’ of light. Backlight often creates a rim, or halo effect around the subject – this is much-used in studio portraiture to separate the outline of the model from the background. If you intend to emphasize the outline shape of your subject, use backlight.
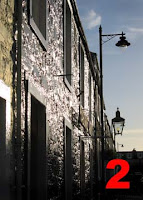
 Photo 2
Using backlight to photograph this street, most of the colour has gone, and the picture looks monochrome. The powerful backlight has shown the outline shape of the street lamps – and notice the effect of using backlight on the shiny, uneven surface of that dark wall. It really has created a dramatic effect. Remember, backlight over a dimpled, shiny surface – like wet mud, ripples on water, wet cobbles or even wet grass, can create spectacular result
FRONT LIGHT
Put the light source directly behind the camera - front-on to your subject - and you take away the shadows. This tends to ‘flatten’ the image; it loses any 3D effect. However, front light has a great trick up its sleeve… shadows often obscure colours. So if you want to see more colour – use front light. The downside is that you lose texture and form in your subject.
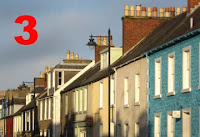
 Photo 3
With the light almost directly behind the camera and front-on to the subject, I have tried to accentuate the bright colours of these houses by taking most of the shadows away. But at a cost – look how flat and two-dimensional the chimney pots look. The shadows you can see in the bottom of the picture are cast by a row of houses behind me
TIP
Positioning your subject just inside a doorway, out of the direct sun, is almost guaranteed to offer you good sidelight. This is one of the simplest ways to avoid toplight and create beautifully lit natural portraits when the sun is high in the sky at midday. That’s the time to start looking indoors in search of better, more useable light.
Next, in part 3 - more tips on using the direction of light


1 comment:
Good tip to remember about positioning my subjects just inside of a doorway...If I can't find an open doorway, perhaps I can find something else that will produce a similar effect.
Post a Comment