
'M' MEANS MAGIC
Most digital Single Lens Reflex (SLR) cameras give you a choice of automatic or manual shooting modes…
P - Programme
TV - Time Value, sometimes known as Shutter Priority (S)
AV - Aperture Value, sometimes know as Aperture Priority (AP) or even just ‘A’
M - Manual
I rarely use anything but the ‘M’ mode, so here are the basics – or at least, the way I use it. If I had a dollar for every photographer who has asked me to explain in simple terms how to use ‘M’, I’d be a rich man.
In all modes except 'M' , the camera goes all, or some way, to deciding what it thinks is the ‘best’ exposure. I refrain from saying the ‘correct’ exposure, because like all automatic processes, it doesn’t always do what you want it to in the real world.
That’s why I almost always use the ‘M’ setting. I like to decide on the exposure I want.
The first thing to remember is that when your camera is on the ‘M’ setting it does not mean that you are left entirely to your own devices to arrive at a correct exposure either by guess work or by using a separate, hand-held exposure meter – you certainly do not need one of those. Your camera has a very efficient and perfectly useable exposure meter already built into it.
If you have always used your camera on automatic settings, you might not have noticed that when you switch to the ‘M’ exposure mode, a scale appears somewhere at the side or bottom of the viewfinder. On some cameras this scale appears on the LCD as well. All cameras vary, but most scales will have a plus sign ‘+’ at one end and minus ‘-‘ at the other. Beneath or beside this scale might be a moving pointer, or the graduations themselves may light up. Whichever it is, when the pointer is in the centre of the scale, you have a correct exposure. The graduations are often in 1/2 or 1/3 values, or f stops, so if you have the pointer on either the plus or minus sides of the centre, you will be over or under exposing by the indicated amount. Easy.
In ‘M’ mode, the exposure is adjusted by altering either the aperture and/or the shutter speed settings. As you do this, the pointer on the scale moves. To keep things easy, set your metering to ‘Centre Weighted’ mode. ‘Averaging’ mode is too… well, average, and ‘Spot’ mode is too precise and sensitive until you get used to things. I use ‘Centre Weighted’ almost all the time. In ‘Centre Weighted’ mode, most cameras will take an average light reading of the whole scene, but will take much more notice of the central area, and this can be very useful.
Once you master the basic of the Manual mode, you will quickly realise that you can have total contril ver your exposure. Yes, you will make some mistakes, but that is all part of the learning process. You will find that the rewards from ‘doing it yourself’ and being in control will really enhance your enjoyment from your photography. ‘M’ doesn’t just stand for Manual – it stands for MAGIC!
 1
1
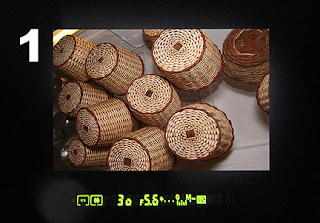
You will see something similar to this in your viewfinder when you are in ‘M’ (Manual) exposure mode. The exposure scale has ‘+’ at one end and ‘-‘ at the other. Here, 1/30sec at f5.6 has given a reading on the ‘minus’ side of the scale – the picture will be under exposed.
2
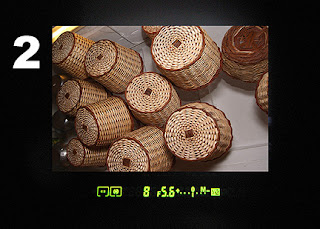
By slowing down the shutter speed to 1/8sec, the reading is now in the centre of the scale at ‘0’. This is the correct exposure for this subject.
 Next, in Part 2, I’ll explain more about the Manual mode and how to use it.
P - Programme
TV - Time Value, sometimes known as Shutter Priority (S)
AV - Aperture Value, sometimes know as Aperture Priority (AP) or even just ‘A’
M - Manual
I rarely use anything but the ‘M’ mode, so here are the basics – or at least, the way I use it. If I had a dollar for every photographer who has asked me to explain in simple terms how to use ‘M’, I’d be a rich man.
In all modes except 'M' , the camera goes all, or some way, to deciding what it thinks is the ‘best’ exposure. I refrain from saying the ‘correct’ exposure, because like all automatic processes, it doesn’t always do what you want it to in the real world.
That’s why I almost always use the ‘M’ setting. I like to decide on the exposure I want.
The first thing to remember is that when your camera is on the ‘M’ setting it does not mean that you are left entirely to your own devices to arrive at a correct exposure either by guess work or by using a separate, hand-held exposure meter – you certainly do not need one of those. Your camera has a very efficient and perfectly useable exposure meter already built into it.
If you have always used your camera on automatic settings, you might not have noticed that when you switch to the ‘M’ exposure mode, a scale appears somewhere at the side or bottom of the viewfinder. On some cameras this scale appears on the LCD as well. All cameras vary, but most scales will have a plus sign ‘+’ at one end and minus ‘-‘ at the other. Beneath or beside this scale might be a moving pointer, or the graduations themselves may light up. Whichever it is, when the pointer is in the centre of the scale, you have a correct exposure. The graduations are often in 1/2 or 1/3 values, or f stops, so if you have the pointer on either the plus or minus sides of the centre, you will be over or under exposing by the indicated amount. Easy.
In ‘M’ mode, the exposure is adjusted by altering either the aperture and/or the shutter speed settings. As you do this, the pointer on the scale moves. To keep things easy, set your metering to ‘Centre Weighted’ mode. ‘Averaging’ mode is too… well, average, and ‘Spot’ mode is too precise and sensitive until you get used to things. I use ‘Centre Weighted’ almost all the time. In ‘Centre Weighted’ mode, most cameras will take an average light reading of the whole scene, but will take much more notice of the central area, and this can be very useful.
Once you master the basic of the Manual mode, you will quickly realise that you can have total contril ver your exposure. Yes, you will make some mistakes, but that is all part of the learning process. You will find that the rewards from ‘doing it yourself’ and being in control will really enhance your enjoyment from your photography. ‘M’ doesn’t just stand for Manual – it stands for MAGIC!
 1
1You will see something similar to this in your viewfinder when you are in ‘M’ (Manual) exposure mode. The exposure scale has ‘+’ at one end and ‘-‘ at the other. Here, 1/30sec at f5.6 has given a reading on the ‘minus’ side of the scale – the picture will be under exposed.
2
By slowing down the shutter speed to 1/8sec, the reading is now in the centre of the scale at ‘0’. This is the correct exposure for this subject.
 Next, in Part 2, I’ll explain more about the Manual mode and how to use it.

1 comment:
Thank you Philip for posting this, this has helped me more then anything else I have read so far.
Post a Comment